- What personal data is exposed on your Facebook profile?
- Where are the privacy settings on Facebook?
- Review your current Facebook privacy settings
-
Update your Facebook privacy settings to protect your data
- Control your Facebook profile searchability
- Turn off contact uploads
- Turn off mobile location history
- Update your Facebook profile picture and cover photo
- Sharing your Facebook profile to search engines
- Manage third-party access
- Change the default settings for future posts
- Restrict access to older posts
- Opt out of Meta AI data scraping
- Take control of Facebook tagging
- Protect your friends list and friends requests
- Limit who can message you on Facebook
- The best VPNs for Facebook
- How does Facebook use your data?
- Why make your information on Facebook private?
- Take Control of Your Data
- FAQ
Facebook collects vast amounts of personal information about users, like your contact information, browsing history, buying habits, and so much more. Facebook uses this data to deliver targeted ads and personalize your feed. Here’s how to optimize your Facebook privacy settings:
- Manage the Facebook posts you’re tagged in
- Block Facebook activity tracking
- Control the Facebook ads you see
- Check for unrecognized Facebook logins
- Control your Facebook profile searchability
- Turn off contact uploads
- Turn off mobile location history
- Update your Facebook profile picture and cover photo
- Stop Facebook from sharing your profile with search engines
- Manage third-party access
- Change the default settings for future posts
- Restrict access to your older posts
- Take control of Facebook tagging
- Protect your friends list and friend requests
- Limit who can message you on Facebook
We also recommend using a VPN to hide your physical IP address from Meta, secure your browsing on public Wi-Fi, and bypass network restrictions if Facebook is blocked at your school, workplace, or in your country. We’ve tested several VPNs, and NordVPN is our top VPN for Facebook because it consistently provides fast, reliable connections and robust privacy features that keep your online activity secure and anonymous.
Continue reading for detailed step-by-step instructions on how to improve your Facebook privacy settings. We also provide additional Facebook privacy tips.

With over 3 billion users, Facebook remains a massive part of daily life, but it also comes with growing privacy concerns. Meta collects extensive data to power its ecosystem, and newer risks, including AI data usage and highly targeted scams, make it harder to stay protected.
To address these changes, Meta has moved many privacy controls into its unified Accounts Center, making settings harder to navigate but still accessible. In this guide, you’ll learn how to adjust Facebook’s privacy settings, limit data sharing, and take control of your personal information in 2026.
What personal data is exposed on your Facebook profile?
A simple search of your name on Facebook can reveal more personal information than you may imagine, including:
- Your posts
- The pictures saved on your profile
- Your friends
- Your contact information, like your email address
- The schools you attended
- Your Reels and Stories
Follow the steps below to see what personal information is exposed on your Facebook profile:
- Log in to your Facebook account and navigate to your profile by clicking on your name at the top of the left-hand menu.
- Click the three dots next to “Edit profile” to open a menu.

- Click “View As.”
Now you’re viewing your profile like a stranger. The information you see here is what anyone can see when they search for or come across your Facebook profile.

This information is available to anyone online – whether they have a Facebook profile or not. Continue reading to learn how to limit access to your personal data on Facebook.
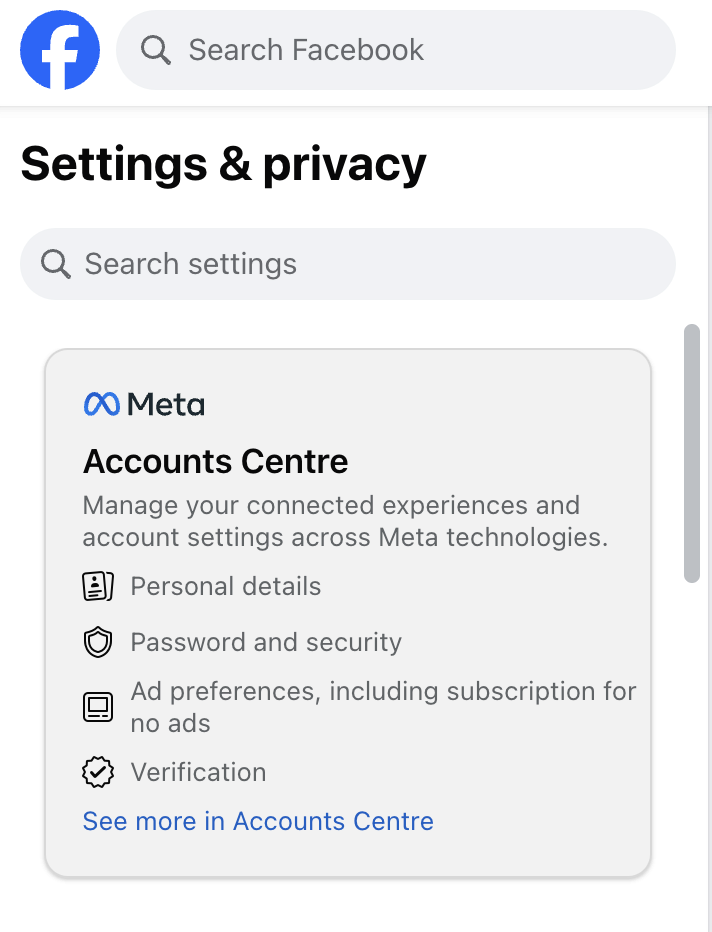
Where are the privacy settings on Facebook?
The most important Facebook privacy settings are under “Settings & privacy.” To protect your information from prying eyes, you need to tweak these settings. We fired up our long-unused Facebook profile and scrolled through the pages to identify the best Facebook settings to adjust for improved privacy.
Here’s how to find the privacy settings on Facebook:
- Click your profile picture in the top right corner after logging in.
- Click “Settings & privacy.”
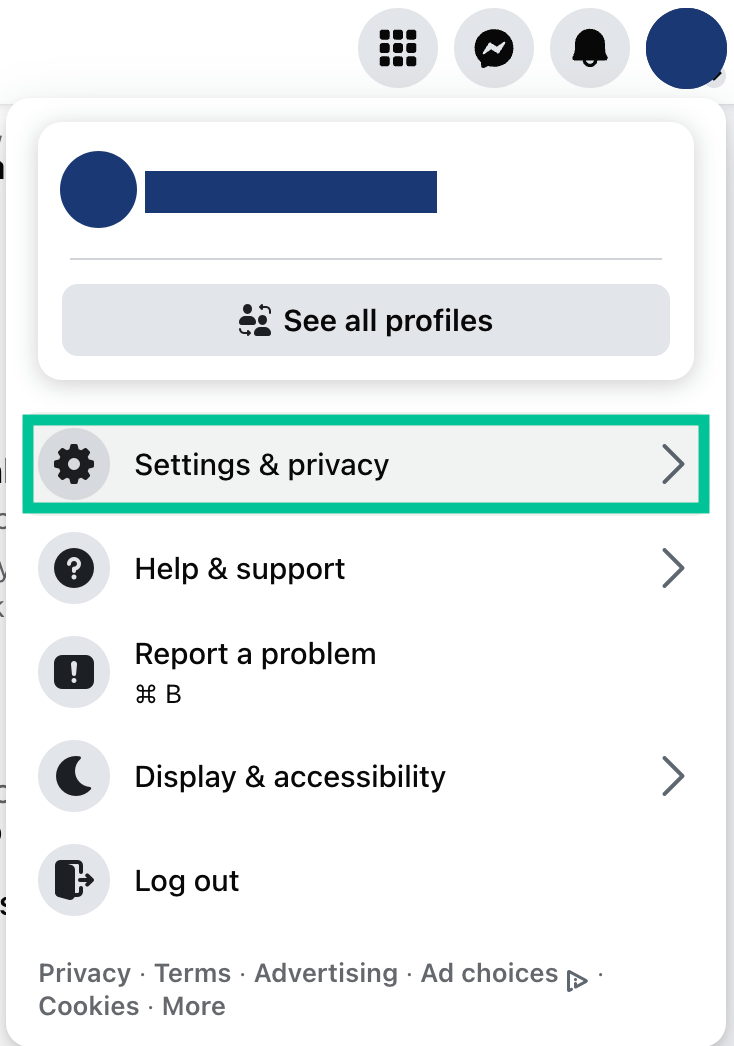
- Tap “Settings.”
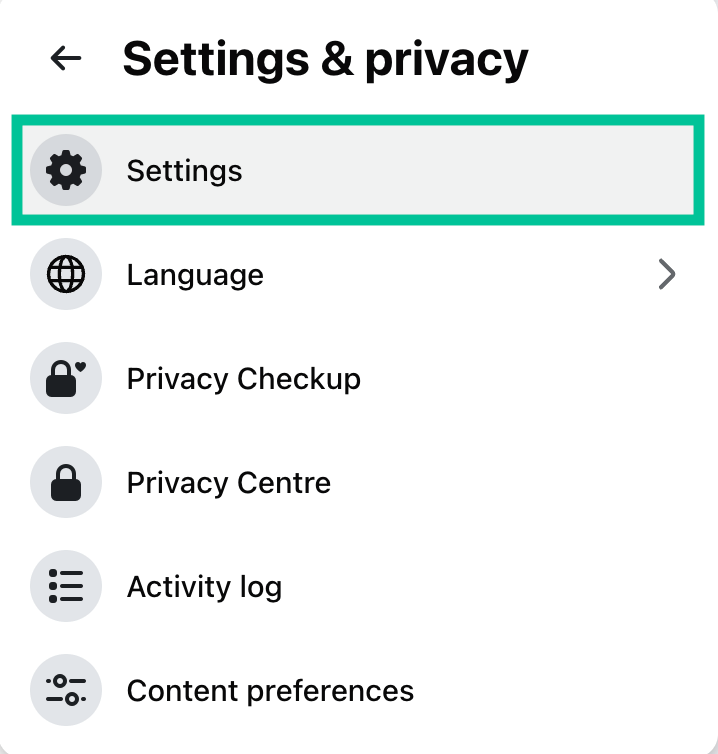
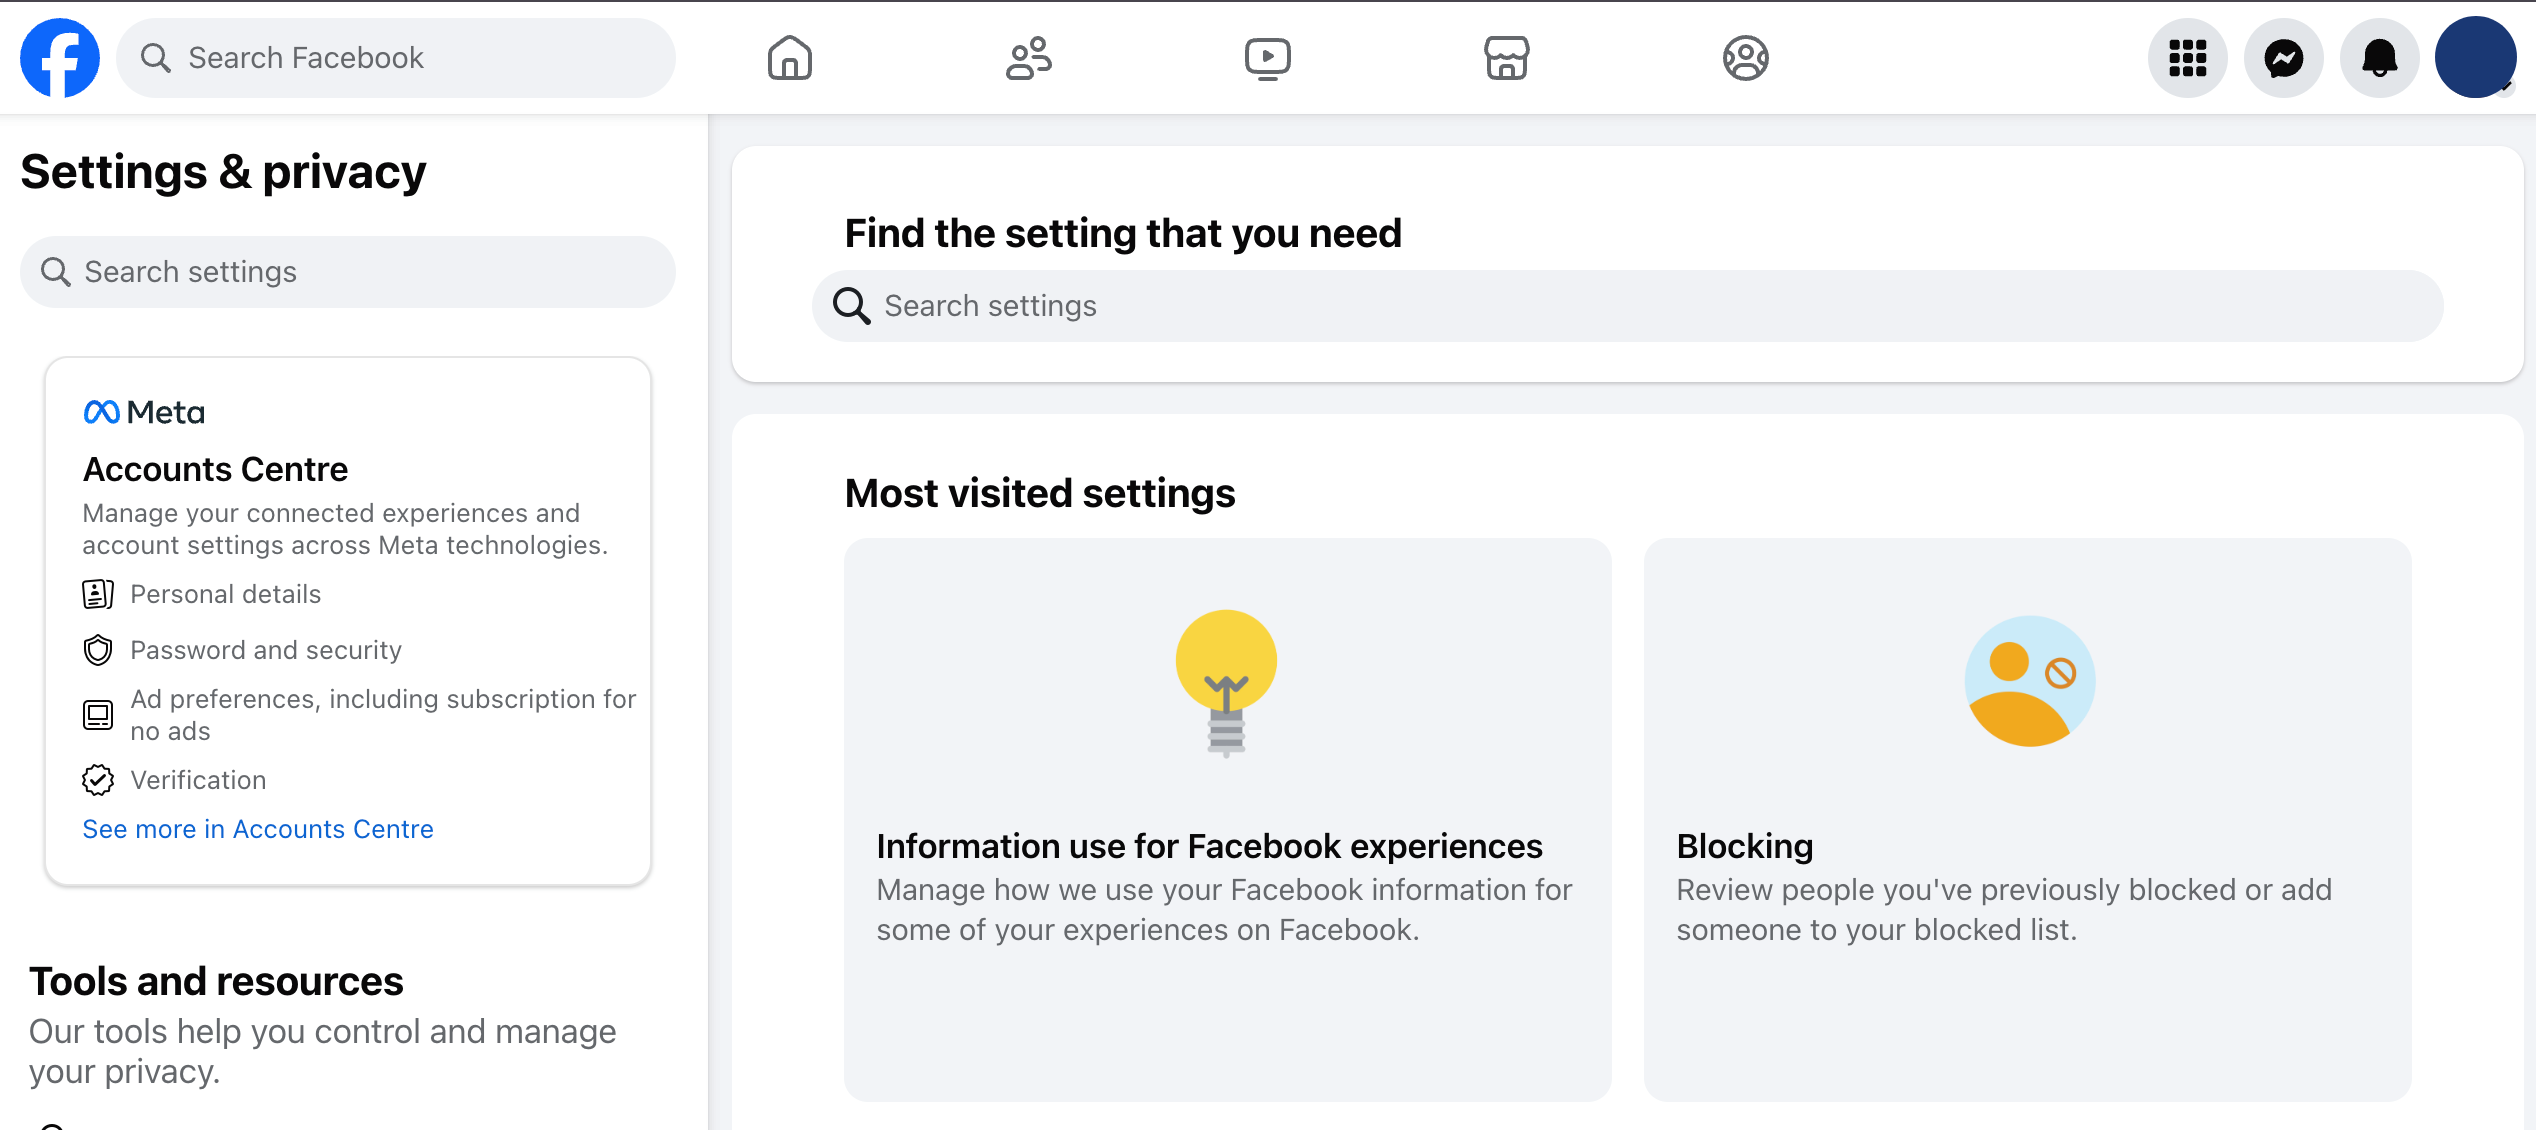
Here, you can adjust your Facebook privacy settings to protect your personal data. Read on to uncover other privacy settings not listed on this page.
Review your current Facebook privacy settings
It’s important to review your current Facebook privacy settings to see if your account is secure. This allows you to take action to protect your personal information and keep your Facebook account safe.
Manage the Facebook posts you’re tagged in
When you’re tagged in a Facebook post, your friends and the friends of the people who tag you can see the post. And, if the post is set to public, anyone on Facebook can see it.
While this might not seem like a big deal, it could pose an issue if the post is offensive or goes against your school, employer, or future employer’s policies. It could also allow stalkers to identify your friends and acquaintances.
Follow the steps below to manage the Facebook posts you’re tagged in.
- Log in to your Facebook account and navigate to your profile by clicking on your name at the top of the left-hand menu.
- Click on “Manage Posts.”

- Review the posts and check the boxes for any posts you have been tagged in that you would prefer not to show on your timeline. You can choose up to 50 posts at a time. Then click next.

- Choose whether to hide it from your timeline or remove the tag and click done.

- Repeat as necessary.
Block Facebook activity tracking
Whether you’re a frequent Facebook user or haven’t logged in to your account in a long time, Facebook is still tracking you and collecting your data. It may come as a surprise that apps such as LinkedIn, Uber, and Home Depot, among others, send your data to Facebook.
When we checked one of our phones to see what apps share our data with Facebook, here’s what we found.

The majority of these apps send data to Facebook every 180 days. The data these apps share may contain information about your activities, like the time of login, what you searched for, what you bought, and much more.
This is just a glimpse into how much Facebook tracks you, whether you use its app/services or not. While changing your settings stops Facebook’s behavioral tracking, your device still broadcasts its IP address every time you log in. We strongly recommend using a reliable VPN to mask your IP address, which stops Facebook from logging your real-world physical location.
Besides using a VPN, you can tweak your Facebook settings to opt out of this tracking. Here’s how to go about it:
- From the “Settings” menu, choose “Accounts Center.”
- Under “Your Information and Permissions,” click “Your Activity Off Meta Technologies.”
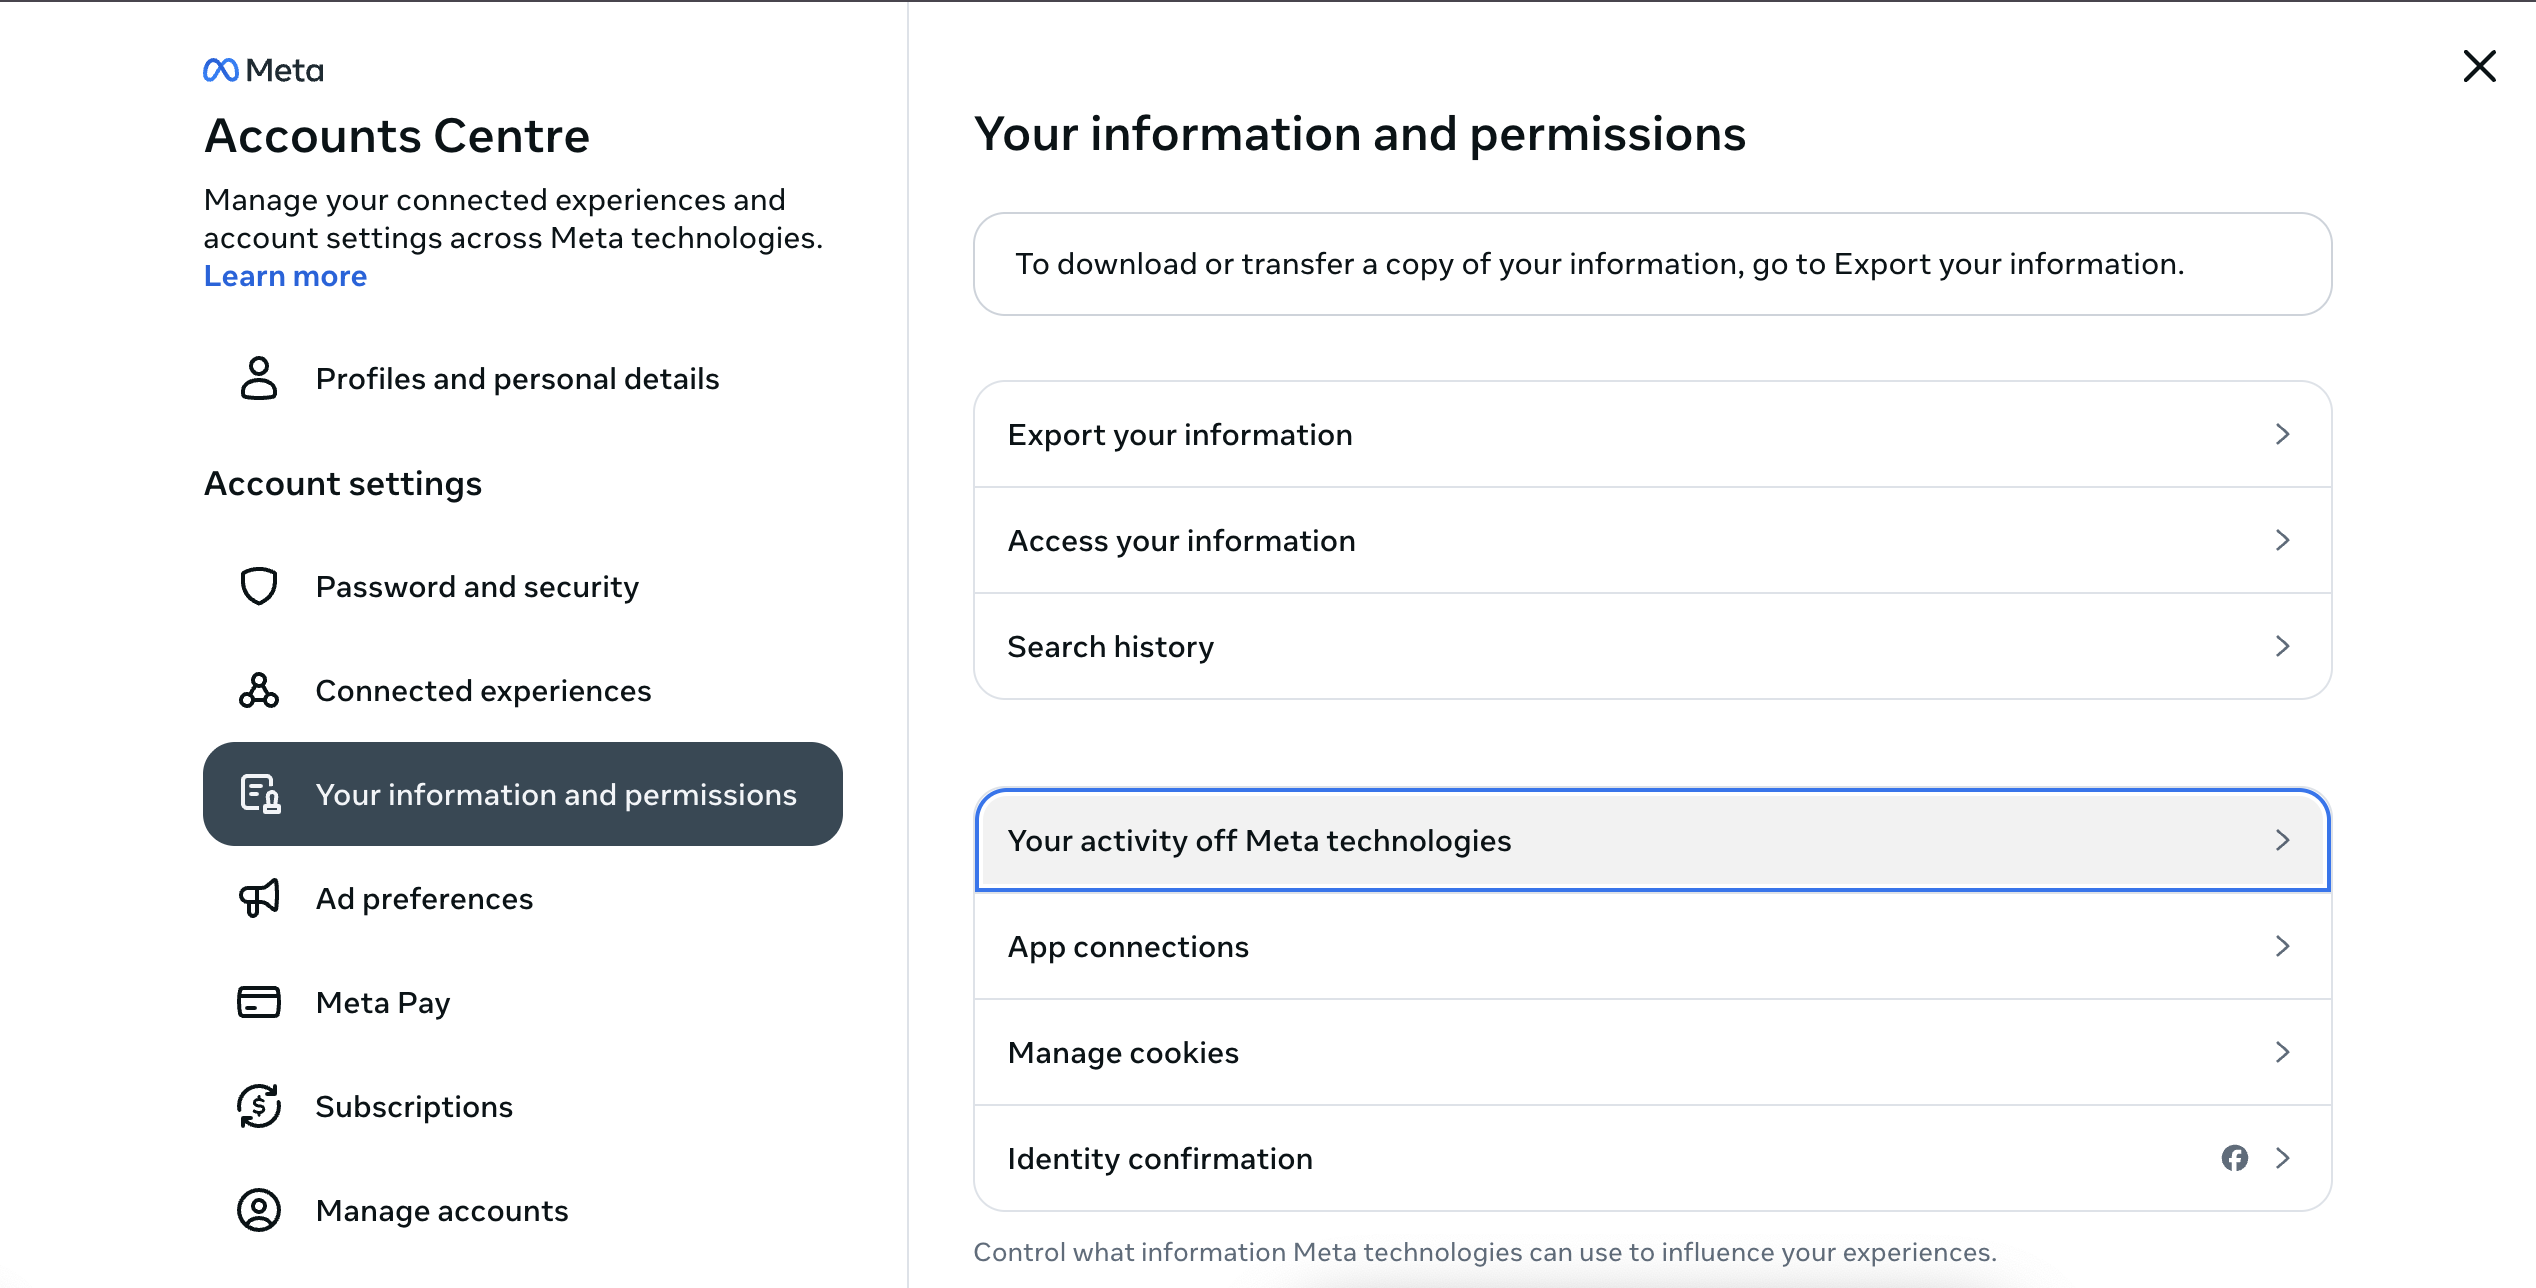
- Under “What You Can Do,” choose “Disconnect Specific Activity” to select specific third-party websites and apps to clear information from, or click “Clear Previous Activity” to clear all information shared with Facebook.
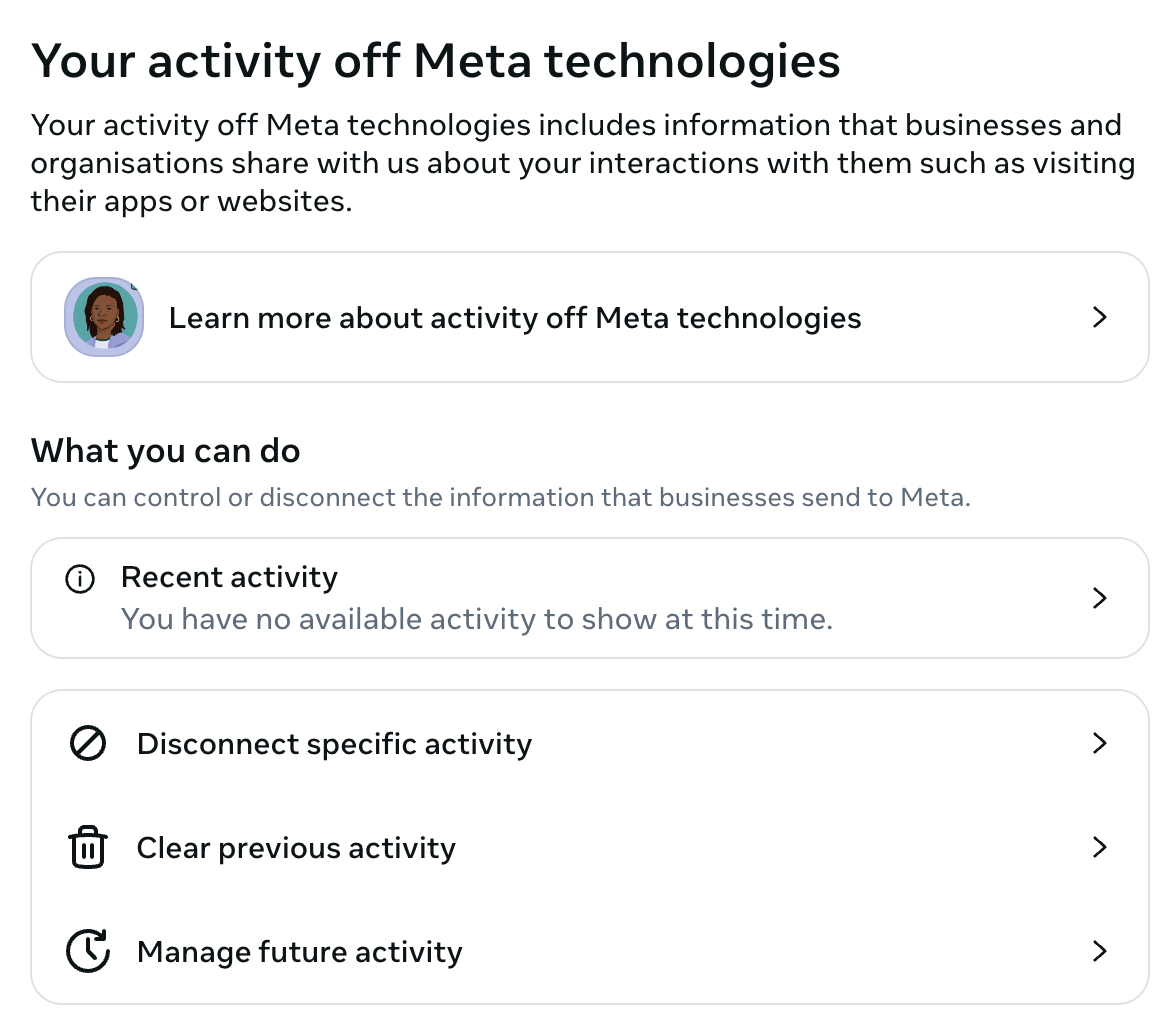
- Now, choose “Manage Future Activity” to stop information from being shared with Facebook going forward.

Turn off Facebook’s Link History tracking (mobile app)
Meta recently introduced a feature called “Link History” for the Facebook mobile app (iOS and Android). By default, whenever you click a link inside the Facebook app, it opens Facebook’s built-in browser. While convenient, Meta actually tracks every single website you visit through this browser and uses that data to build your ad profile.
So if you want to stop Facebook from keeping a log of the sites you visit on your phone, you need to turn this feature off.
Here is how to turn off Link History:
- Open the Facebook app on your phone and tap your Profile Menu (bottom right on iOS, top right on Android).
- Scroll down and expand “Settings and privacy,” then tap “Settings.”
- Scroll down to the “Preferences” section and tap “Browser.”
- Toggle off “Enhanced browsing.”
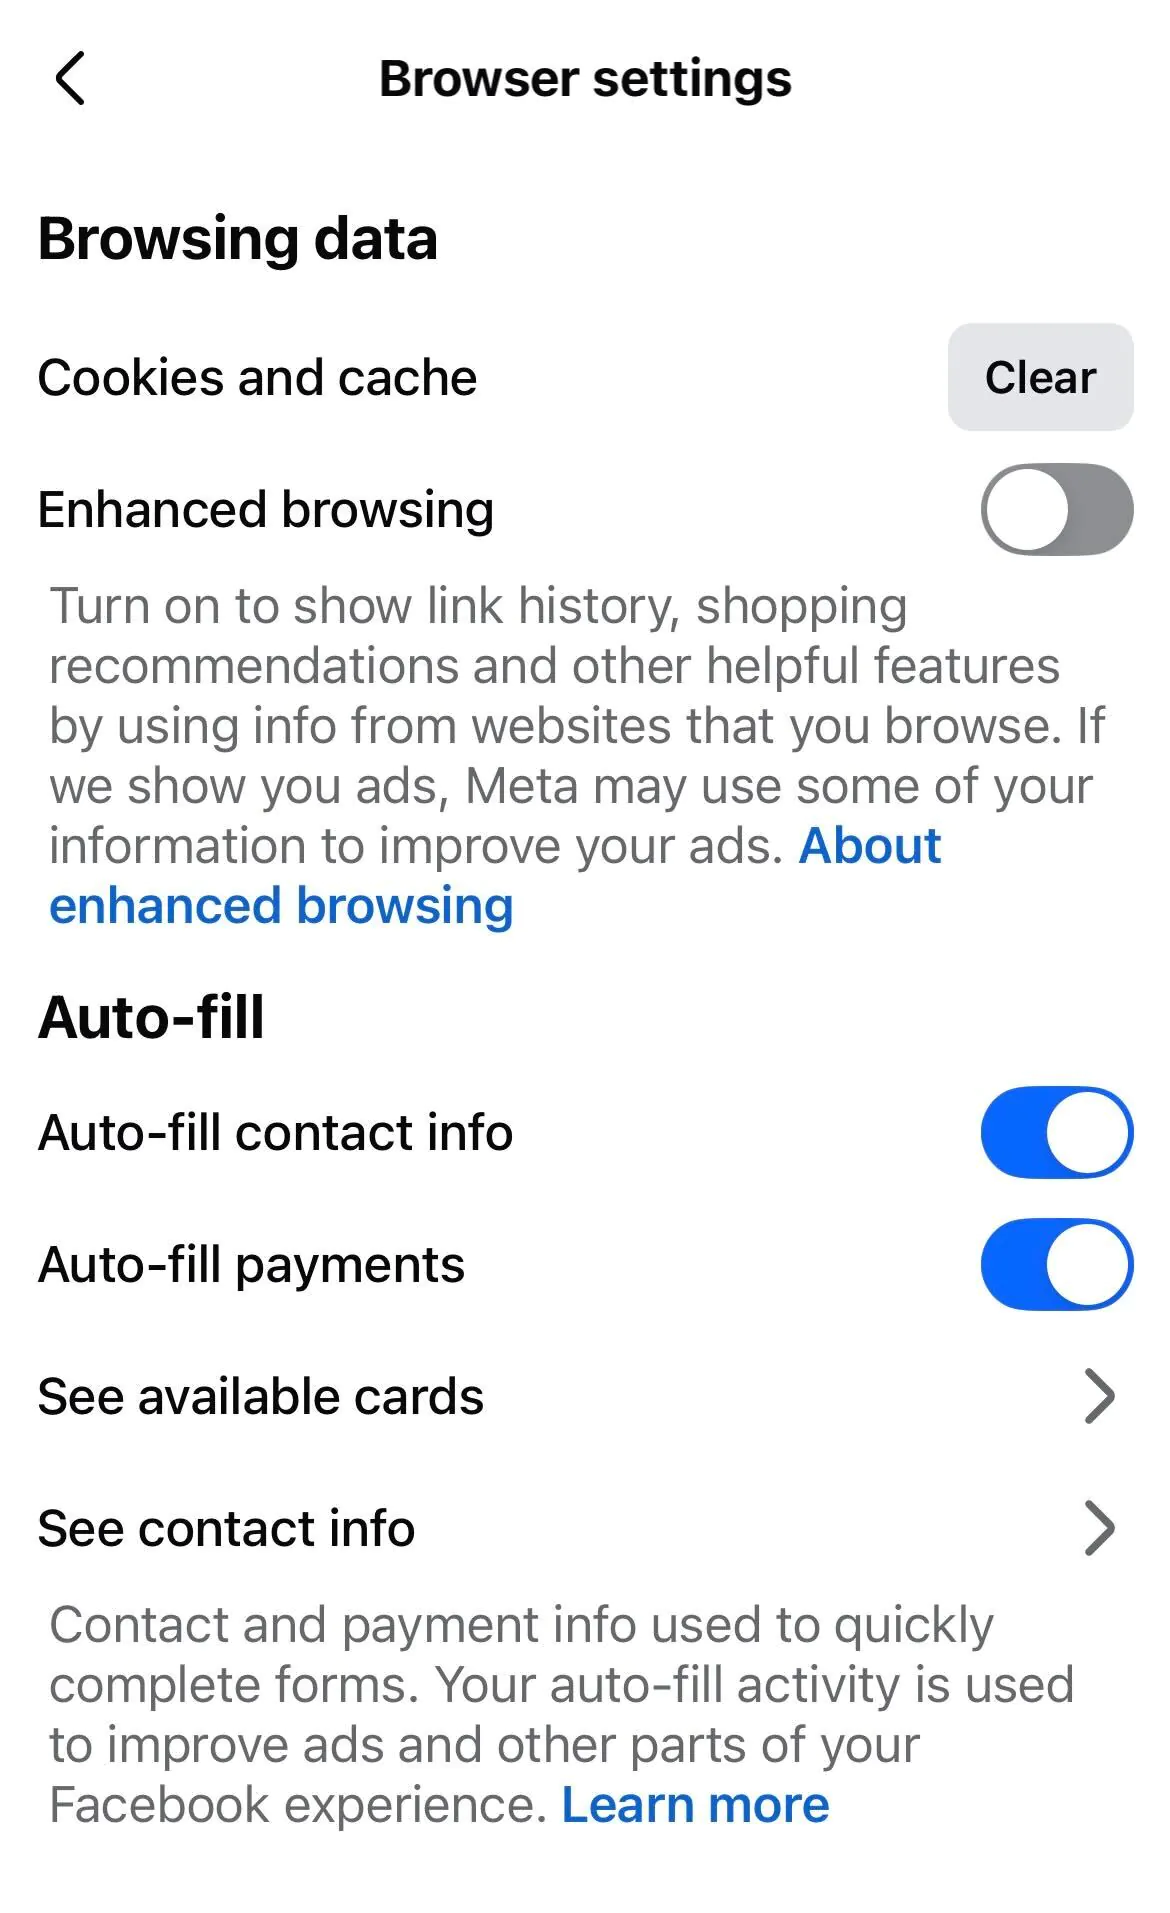
- (Optional) While you are on this page, you can also tap “Clear” next to your link history/cookies and cache to immediately delete the backlog of websites Facebook has already tracked.
Control the Facebook ads that you see
Facebook uses data about your interests to deliver targeted ads. However, you can control the types of ads you see and even block specific advertisers from your feed. These Facebook privacy settings are in the Settings menu under “Ad Preferences.”
- To hide specific advertisers: Click on “Manage ads” and then “Advertisers you saw ads from.” These are advertisers you’ve shared data with or whose ads you have clicked on. Click “Hide ads” under the selected advertiser to stop seeing their ads.
- To reduce the ads you see for a specific topic: Under “Manage ads,” click on “Ad Topics.” These are topics that you have shown interest in. To reduce the number of ads you see for a specific topic, click “See less” next to the topic.
The “Ad activity” section has a lot of eye-opening data that Facebook has curated about you, including things you have clicked on and interacted with through Facebook.
This is how Facebook builds a profile of who you are to deliver targeted ads. You can look through your interests and delete them if you don’t feel they should apply to you.
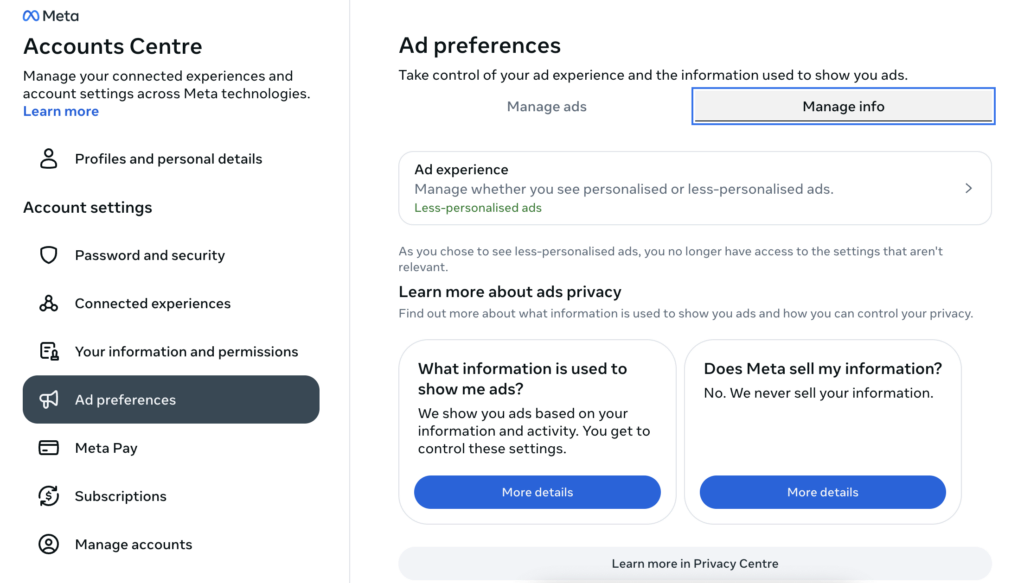
Click on the “Manage info” tab to see the information Facebook has on you. In this section, Facebook will show what it believes your political views are, the types of devices you use, whether you are a parent, how old your children are, and much more.
Check for unrecognized Facebook logins
This might seem obvious, but it is often overlooked. Have you ever forgotten to log out of a friend’s computer or smartphone? This has happened to many of us. Sometimes, you only find out later when they make a silly post on your timeline. This scenario may be harmless and funny, but what if you log in to Facebook on a public computer and forget to log out?
Luckily, it’s easy to check what devices you’re logged in to on Facebook. Follow these steps:
- While logged into Facebook, click on your profile icon in the top right-hand corner of the screen, click “Settings & privacy,” and then select “Settings.”
- Click “Accounts Center” from the “Settings & privacy” menu.
- Click on “Password and Security” and then “Where you’re logged in.”
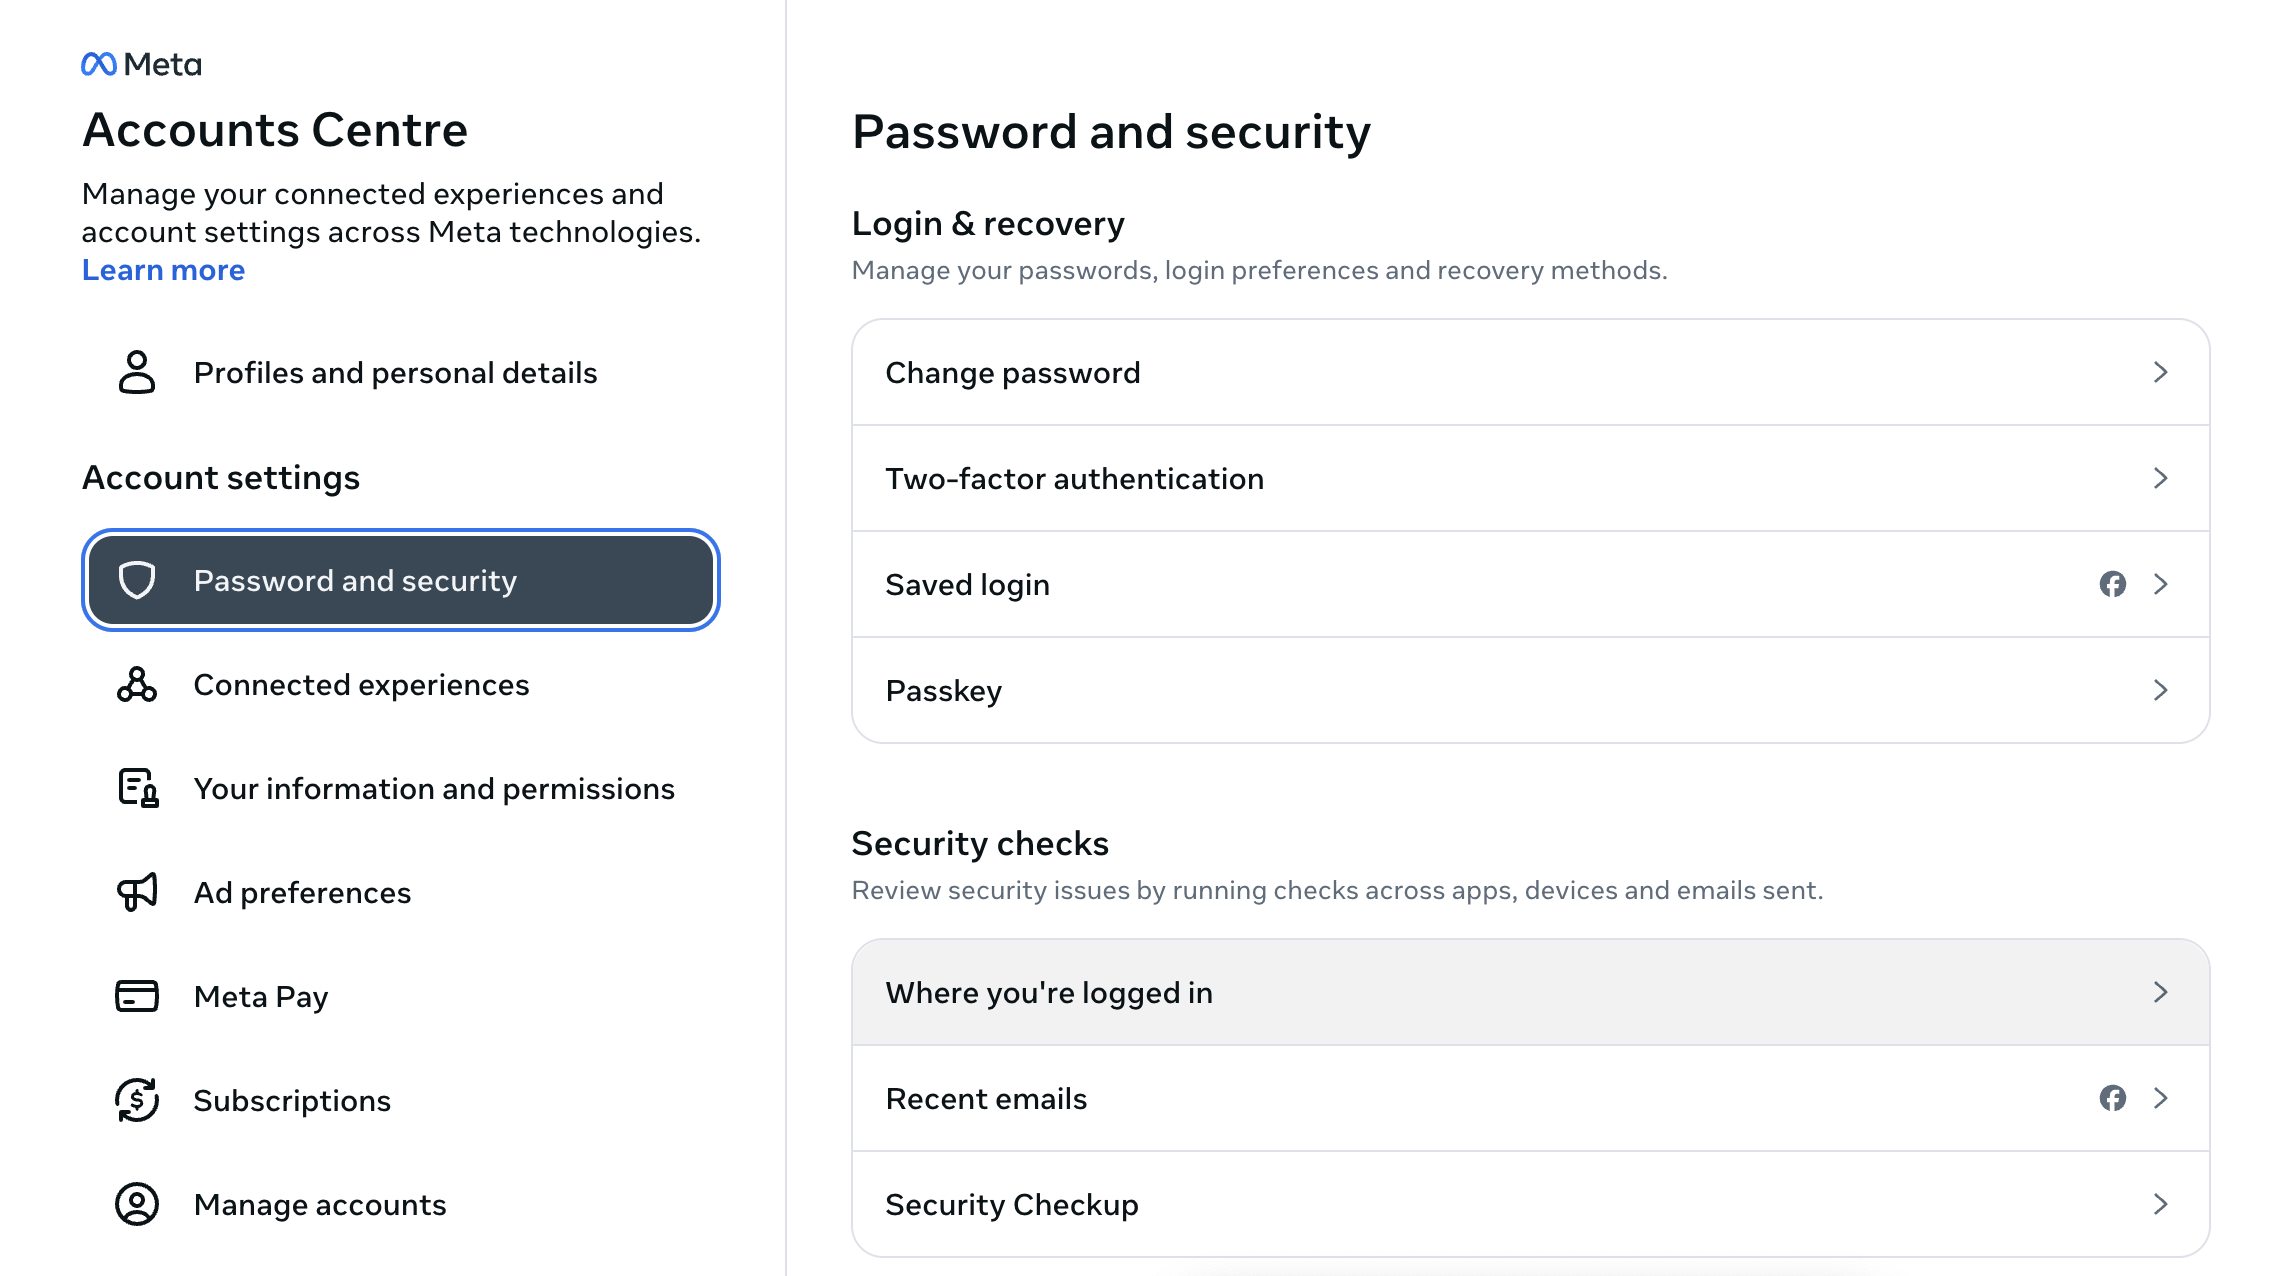
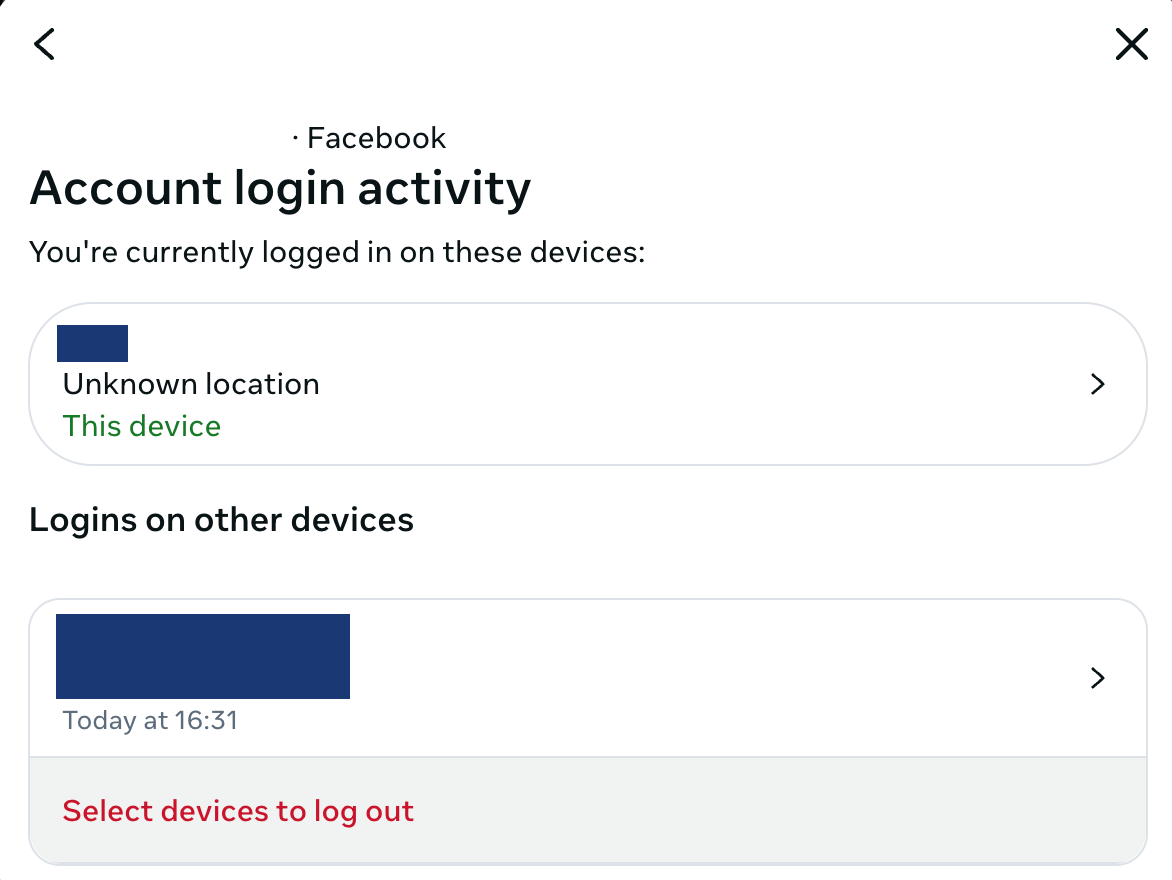
- Review recent logins under your selected account to spot any logins that are unfamiliar or devices that you no longer want to have access to your Facebook account.
- If you find a fishy login, or if you left yourself logged in on another device, click “Select devices to log out” and then “Log out.”
Update your Facebook privacy settings to protect your data
Updating your privacy settings on Facebook will reduce the amount of private information available to Facebook and give you control over who can access your data.
Control your Facebook profile searchability
The first step to improving your Facebook privacy is to take charge of how others find you on the platform.
While you can change your name on Facebook, that might not work for everyone, especially if you still want to connect with friends and family on Facebook. Besides, using a fake name seems shady – and can cause issues if potential or current employers and romantic partners discover the “fake Facebook account.”
Instead, follow the steps below to make it harder for others to find your Facebook account.
- Click on your profile icon the top right-hand corner when logged into Facebook.
- Click “Settings & Privacy,” then “Settings.”
- Click “Accounts Centre” in the left sidebar.
- Under “Profiles and personal details,” you now have the option to edit your name, username, and contact email.
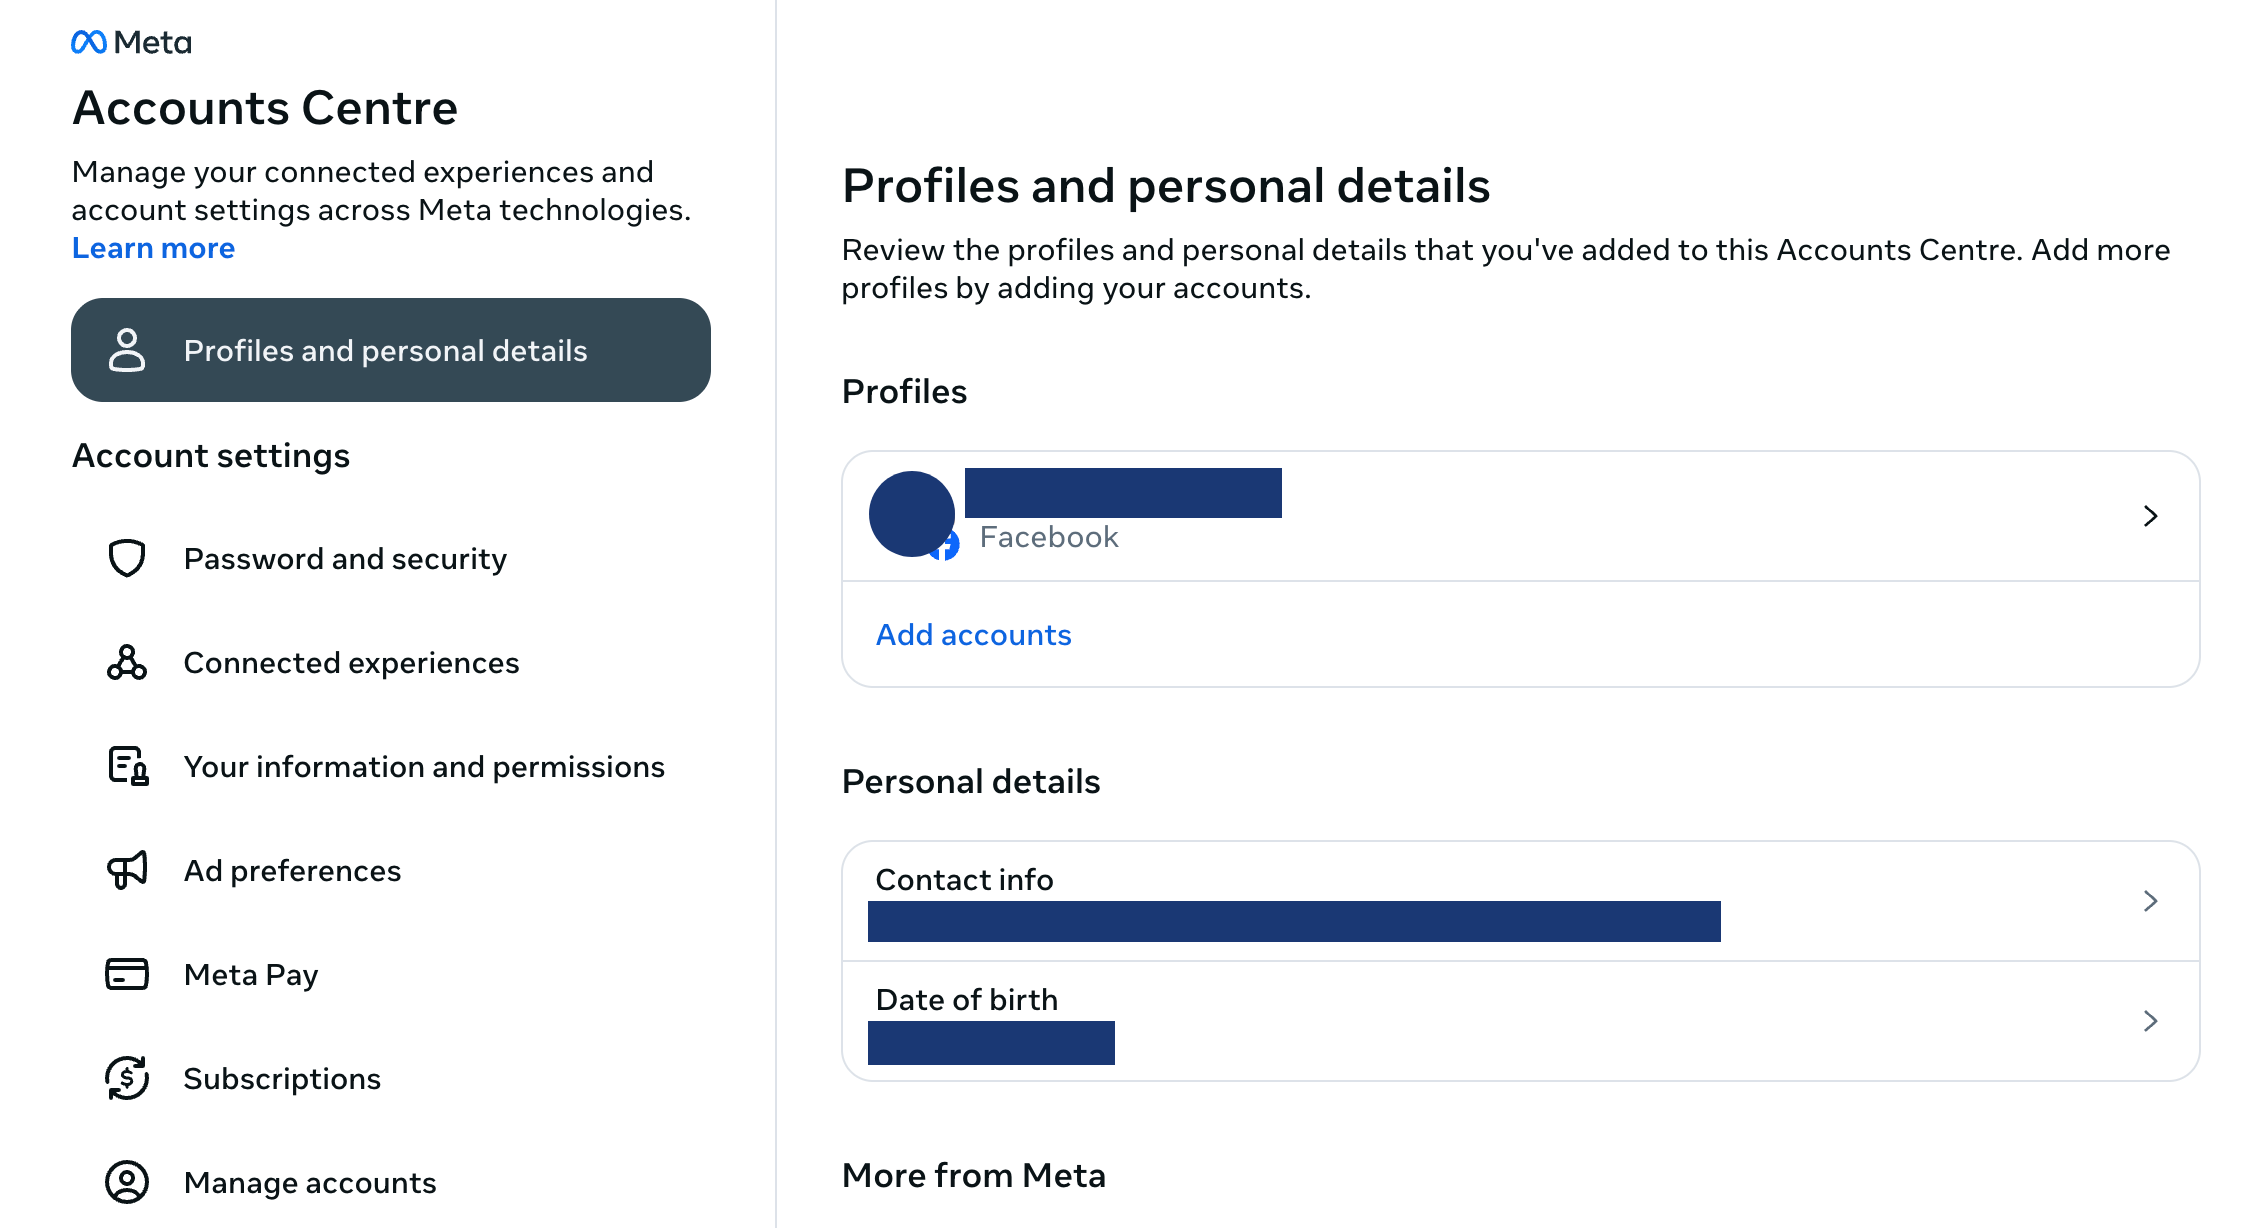
You can make a few changes to make it harder for people to find you on Facebook, like:
- Changing your username to something relevant to you but not your name, such as LovesCooking4
- Updating your contact email to one that does not give away your identity
Turn off contact uploads
When you activate contact uploads, Facebook automatically uploads all the contacts on your phone or tablet. While this makes it easy to find others, it also gives Facebook access to your contacts. Here’s how to turn off contact uploads on Facebook.
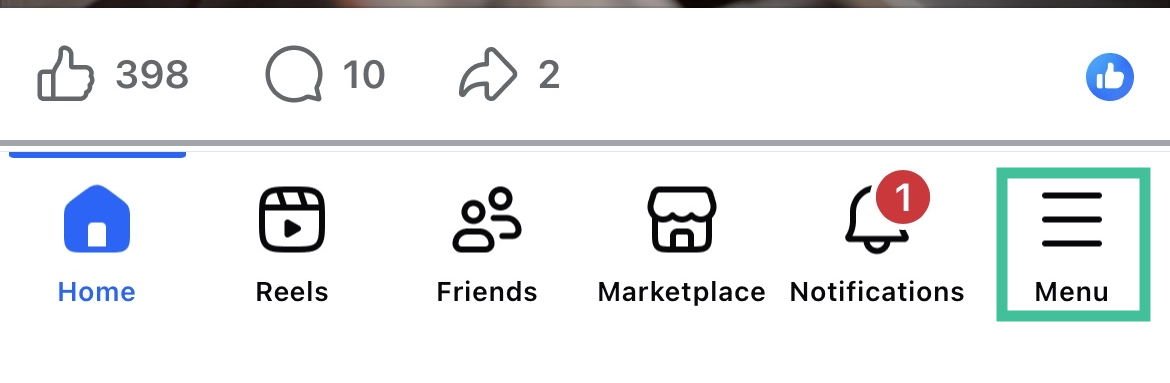
- Log in to Facebook and tap the hamburger menu in the lower right corner.
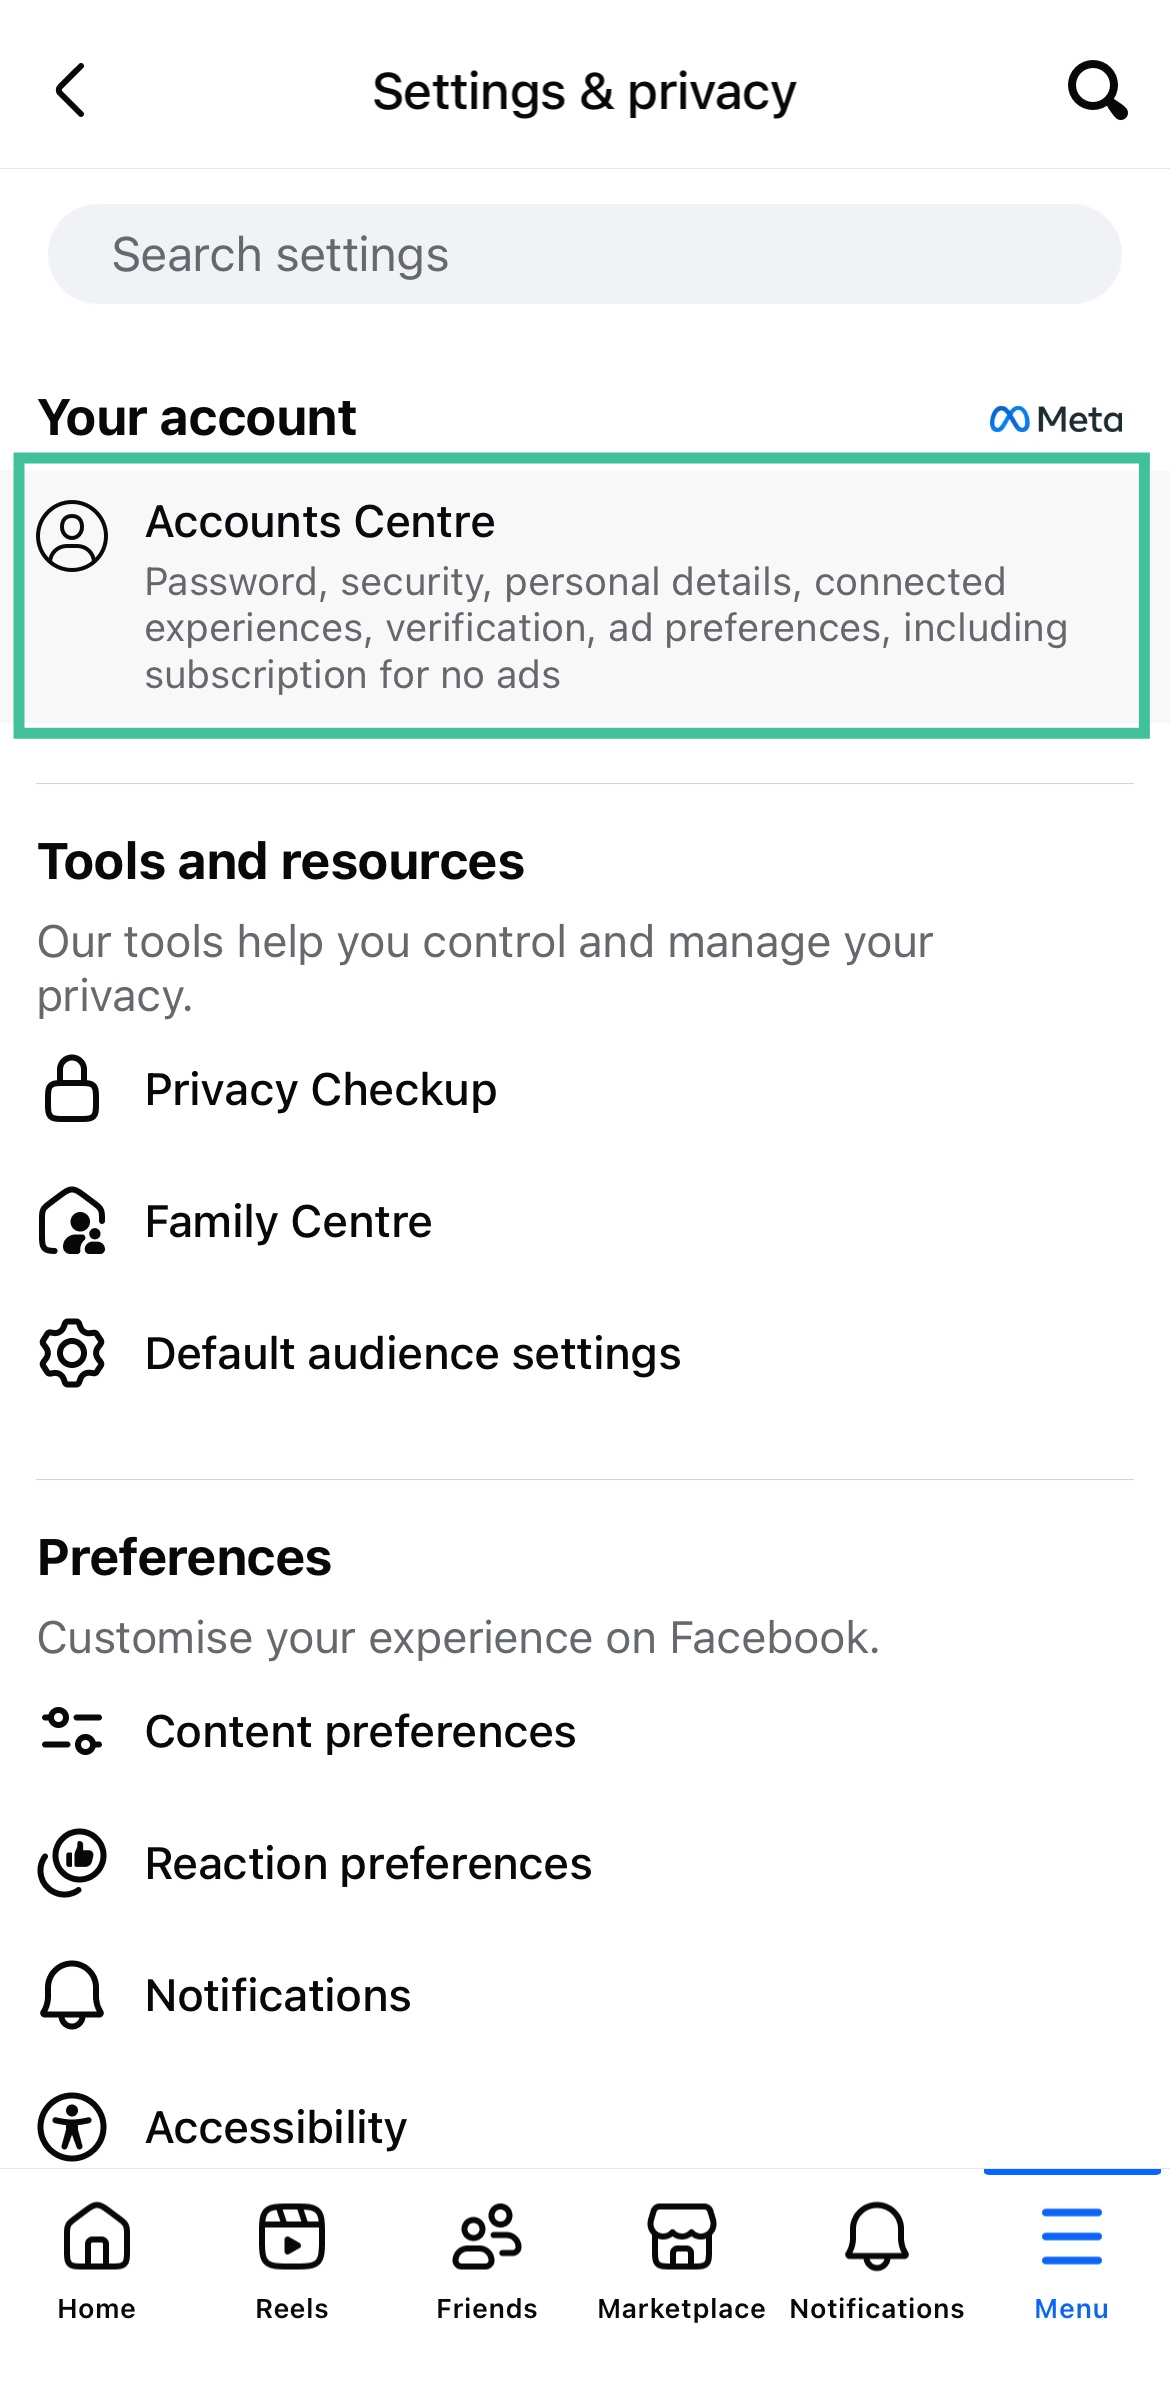
- Tap the cogwheel, click “Accounts Center.”
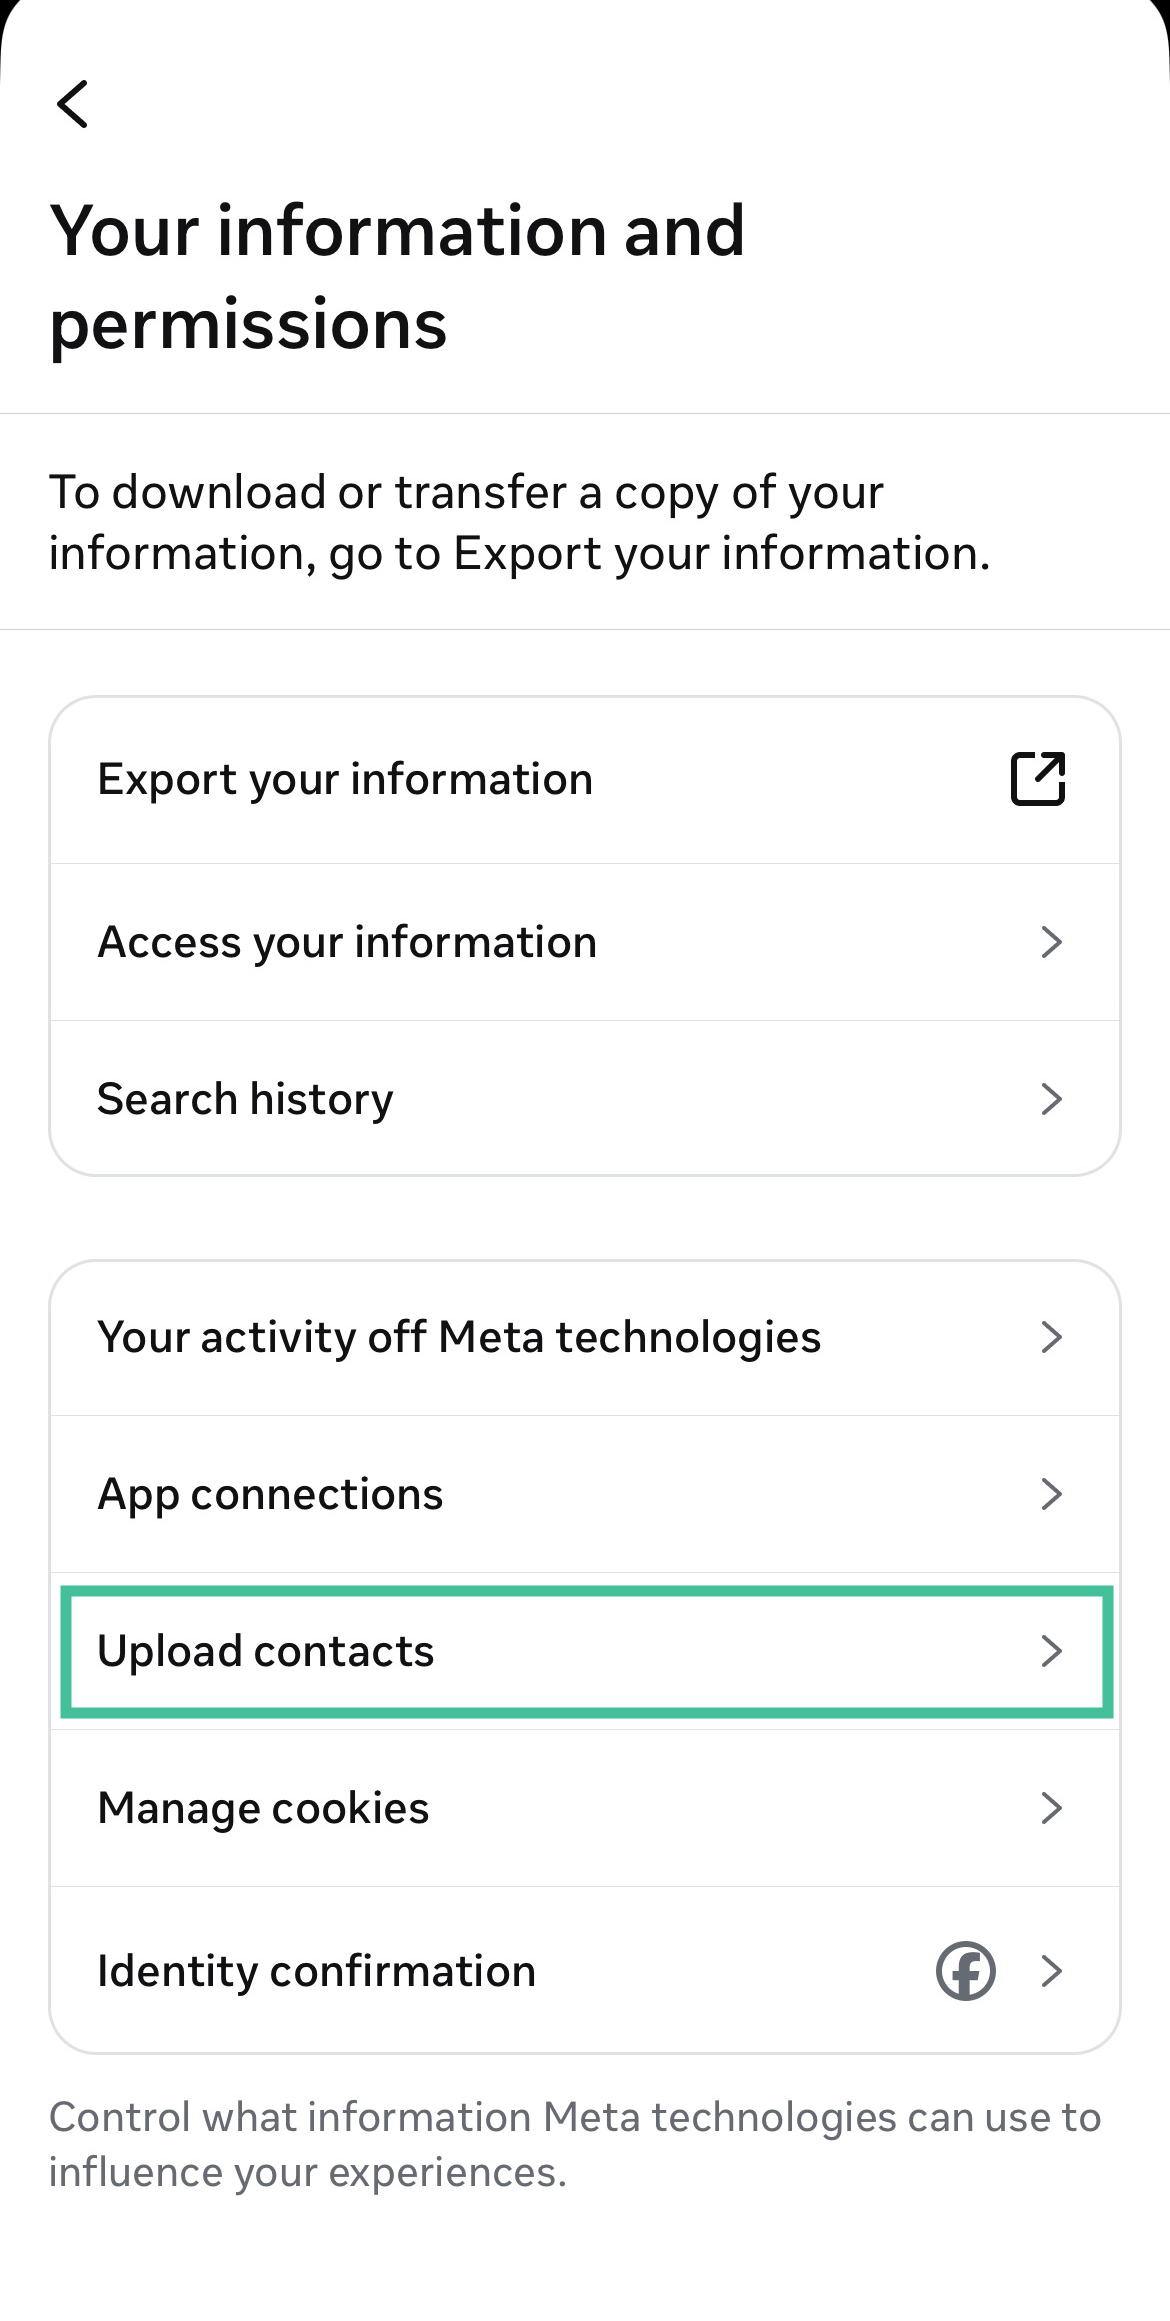
- Select “Your information and permissions” and then tap “Upload contacts.”
- Toggle the switch next to “Upload contacts” to turn this setting on or off.
Turn off mobile location history
Your location history can reveal much about your personal life, like where you live and work, the places you visit frequently, and your routines. Turning off this feature ensures Facebook doesn’t have access to this information.
Here’s how to prevent Facebook from accessing your location.
- Open the Facebook app and go to “Settings” on your device.
- Scroll down to “Apps.”
- Locate Facebook in the list of apps.
- Tap “Permissions,” then “Location.”

- Tap “Don’t allow” to restrict Facebook’s access to your location.

Update your Facebook profile picture and cover photo
A picture of you in front of your workplace or leaning against the back of your car may seem like a good image for your Facebook profile, but such pictures can expose important private information.
Your workplace can give away your location, and a picture of your car could expose your license plate number. In the US, these can be used to get other personal information. If your profile picture is too telling, change it for a simple, professional-looking headshot.
Follow the steps below to change your Facebook profile photo:
- Navigate to your Facebook profile by clicking on your face in the top right-hand menu.
- Click on the camera icon on your current profile picture.
- You can upload a new photo or choose one of the photos already uploaded to Facebook.

Like your Facebook profile photo, your cover photo can also expose potentially revealing information. Your cover photo can be viewed by anyone visiting your Facebook page – and can even be downloaded.
If you have a photo of your kids, home, or something else you might not want anyone to have access to, change it out for a generic picture. For example, you can use an image of ocean waves, beautiful flowers, or something else that doesn’t reveal anything about you or your family.
Changing your Facebook profile cover photo is quite easy. Follow the steps below:
- While logged in to Facebook, click on your face on the top right-hand menu to go to your Facebook profile.
- Click the “Edit Cover Photo” button on your current cover picture.
- Upload a new photo or select an image already uploaded to Facebook. You can also remove your cover photo.

Sharing your Facebook profile to search engines
If you’ve ever searched for your name online, you probably know that your Facebook profile appears in search engine results. Many people don’t know that you can stop your profile from showing up in a Google search.
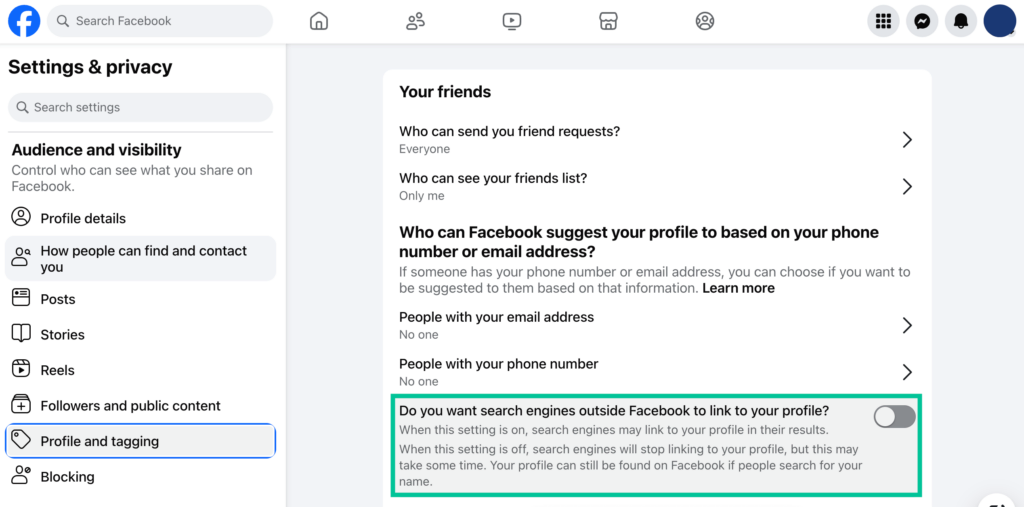
Follow the steps below to stop Facebook from sharing your profile with search engines.
- In the privacy menu of your Facebook settings, head to the section labeled “Profile and tagging.”
- There you’ll see the option to toggle “Do you want search engines outside of Facebook to link to your profile?” on and off.
- When you uncheck that option, your Facebook page won’t appear in search engine results.
Manage third-party access
When you subscribe to a website or app, you can log in using your Facebook account. While this is convenient, it’s not secure.
If you do this repeatedly, over time, different companies will have access to your personal information on Facebook. Moreover, most people never go back to revoke permissions when they stop using an app or website that they signed up to using Facebook.
Luckily, managing third-party access to your Facebook account is easy. You can manage these permissions directly from Facebook. Follow the steps below to review and remove third-party access to your Facebook account.
- Click on your profile icon in the top right-hand corner of the Facebook screen after logging in.
- Click on “Settings and privacy.”
- Click “Settings.”
- Under the Settings menu, choose “Apps and Websites.”
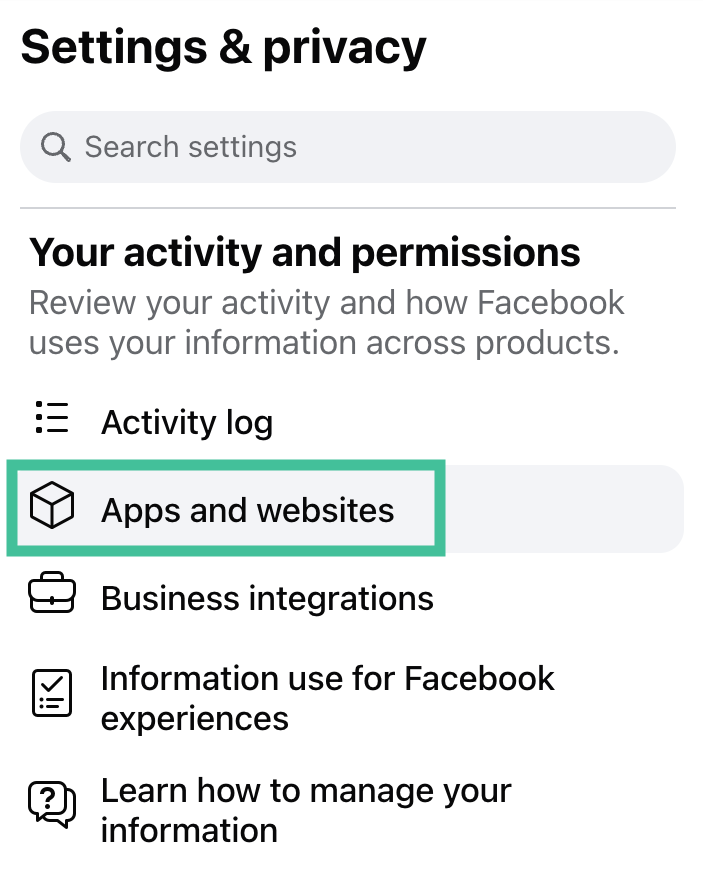
- You will see a list of apps and websites that have access to your Facebook account. Click “View and Edit” if you want to change the permissions for each app, or click “Remove” to block access to your Facebook account.

- If you choose to remove access, a dialogue box will follow. This will give you the option to also delete any posts that the website or app has made on Facebook on your behalf.
If you prefer not to allow any apps or websites to access your Facebook profile, you can turn off all permissions by finding the “Apps, Websites, and Games” option at the bottom of this page. Click “Turn Off” to block access to all apps and websites.

Change the default settings for future posts
Your posts can reveal a lot of information about you, even details you may not want to be public, like your location or your relationship status. By default, all Facebook posts are public. However, you can limit who can see your posts. Here’s how to do it:
- Click the triangle in the top right-hand corner of the Facebook screen. Choose “Settings and privacy” from the drop-down menu.
- Click “Settings.”
- Under “Audience and visibility,” you’ll find your Post, Stories, and Reels settings.
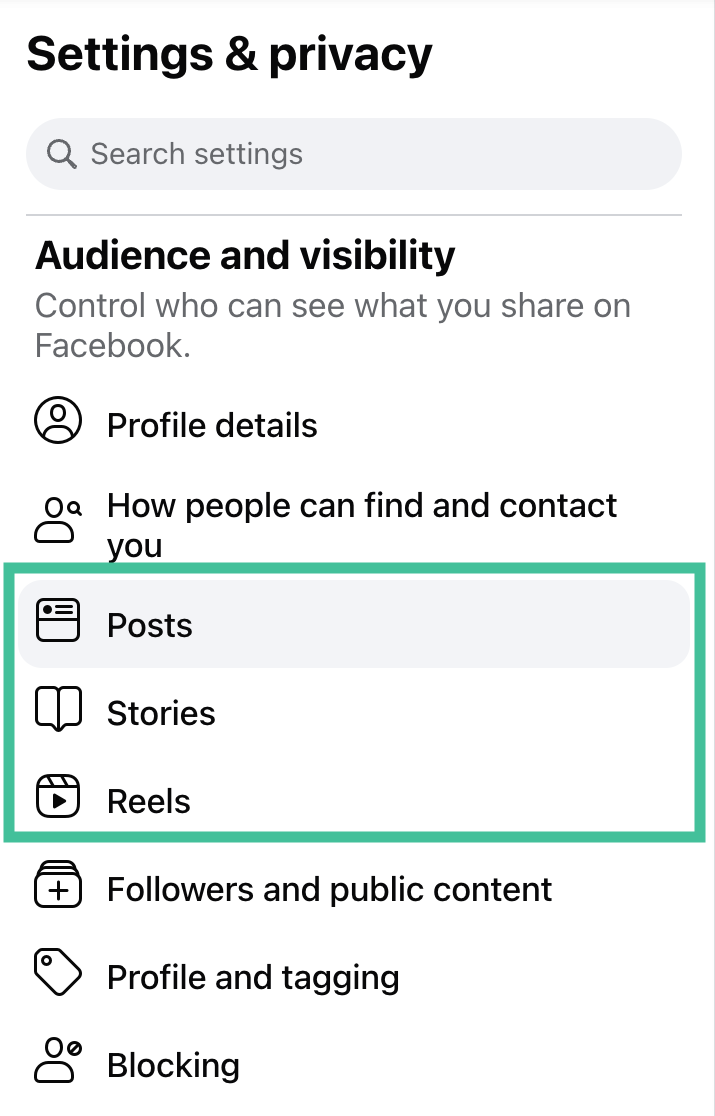
- Click “Posts” and choose either “Only Me,” “Friends,” or “Specific Friends” to determine who can see your posts.
Restrict access to older posts
To further bolster your security on Facebook, you can limit access to your older posts.
If you’ve been using Facebook for a few years, chances are you weren’t as security-conscious as you are today. Over the years, you may have published hundreds of posts on Facebook. Facebook gives you the option to choose who can see your older posts. You can limit access to just your friends or make it private.
Follow these steps to make your older posts more private:
- From the “Settings and privacy” menu, go to Settings.
- Select “Privacy.”
- Under “Audience and visibility,” select “Posts.”
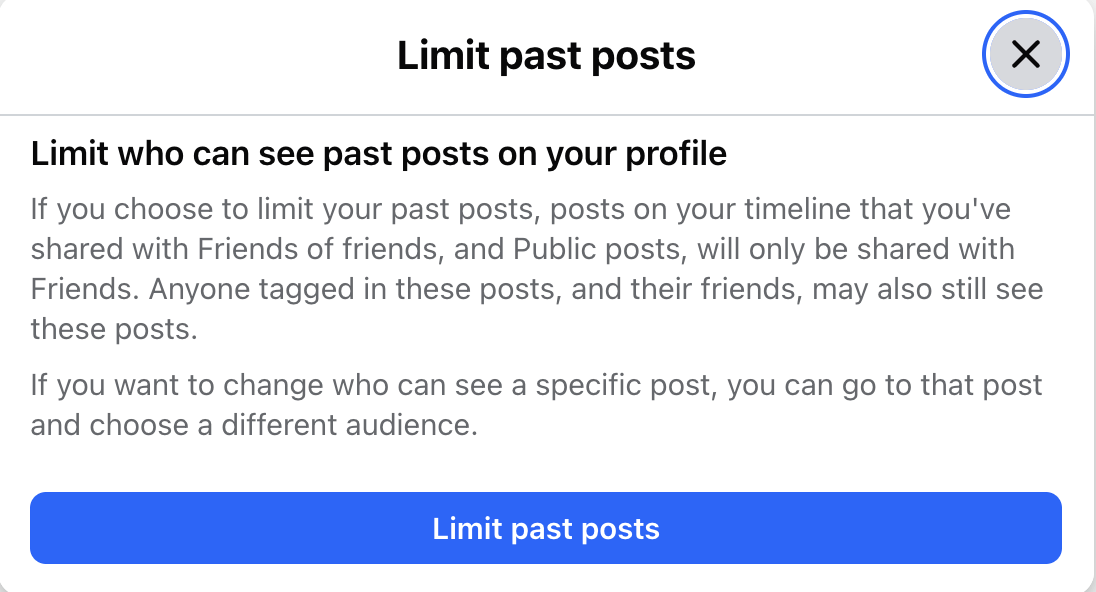
- Click “Limit Past Posts.”
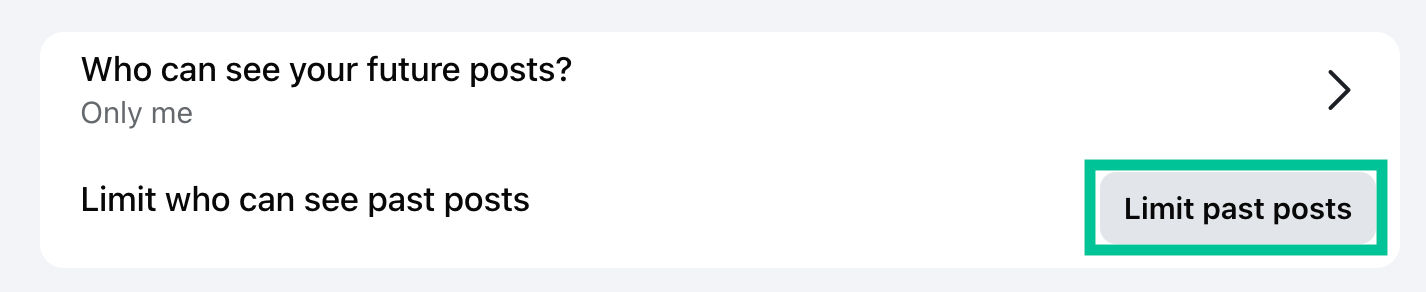
- Click “Limit Past Posts” again. This will change the privacy setting for your older posts to “Friends Only.”
Opt out of Meta AI data scraping
Meta now uses real user data, including public posts, photos, and captions, to train its generative AI models (Meta AI). If your profile is public, your pictures and statuses are likely being fed into their machine-learning algorithms.
Currently, Meta does not offer a simple “on/off” switch to stop this, but there are two main ways to protect your data from being scraped for AI:
- Make your posts non-public (The Easiest Method)
Meta has explicitly stated that it uses publicly shared posts to train its AI. The best way to protect your photos and thoughts is to lock down your account.
- Go to “Settings & privacy” and head to “Settings.”
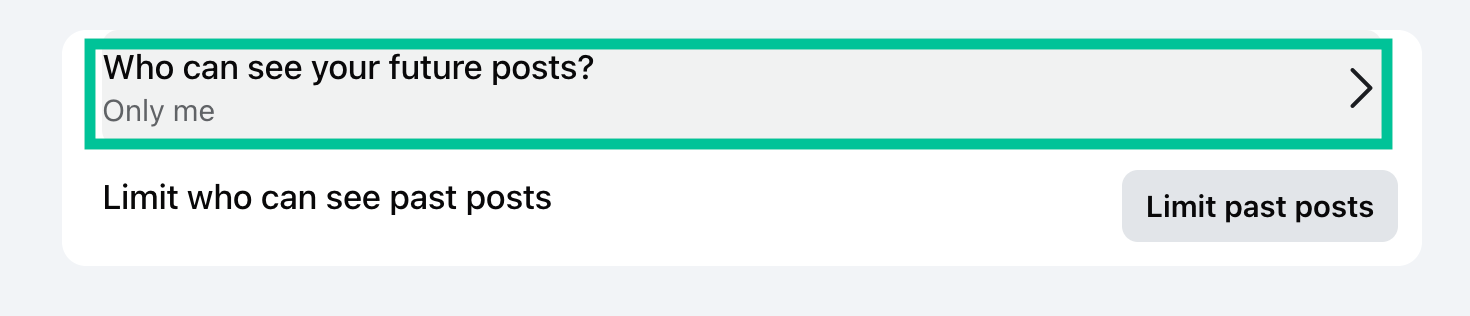
- Under “Audience and visibility,” tap “Posts.”
- Change “Who can see your future posts?” from Public to Friends.
- Tip: You should also use the Limit past posts tool in this same menu to instantly change all your old public posts to “Friends only.”
- Submit an Objection Form (For EU/UK Users)
If you live in a region with strict privacy laws like the EU or the UK (under GDPR), you have the legal right to object to Meta using your personal data for AI.
- Go to your Facebook “Settings.”
- Scroll down and tap on the “Privacy Center“.
- Search for “Generative AI Data Subject Rights” (or look for the “Generative AI” section).
- Click on the link to submit an objection form. You will need to provide a brief reason (e.g., “I do not consent to my personal data being used for machine learning or AI training due to privacy concerns”). Meta is legally required to review and honor these requests in applicable regions.
Take control of Facebook tagging
Facebook allows you to control who can tag you in a post or photo – and under what circumstances. You can also control who can see the posts you’re tagged in.
Facebook notifies you when someone tags you in a post. This way, you can approve before the post appears on your timeline.
Follow these steps to update your Facebook privacy settings and limit who can tag you and which posts appear on your timeline.
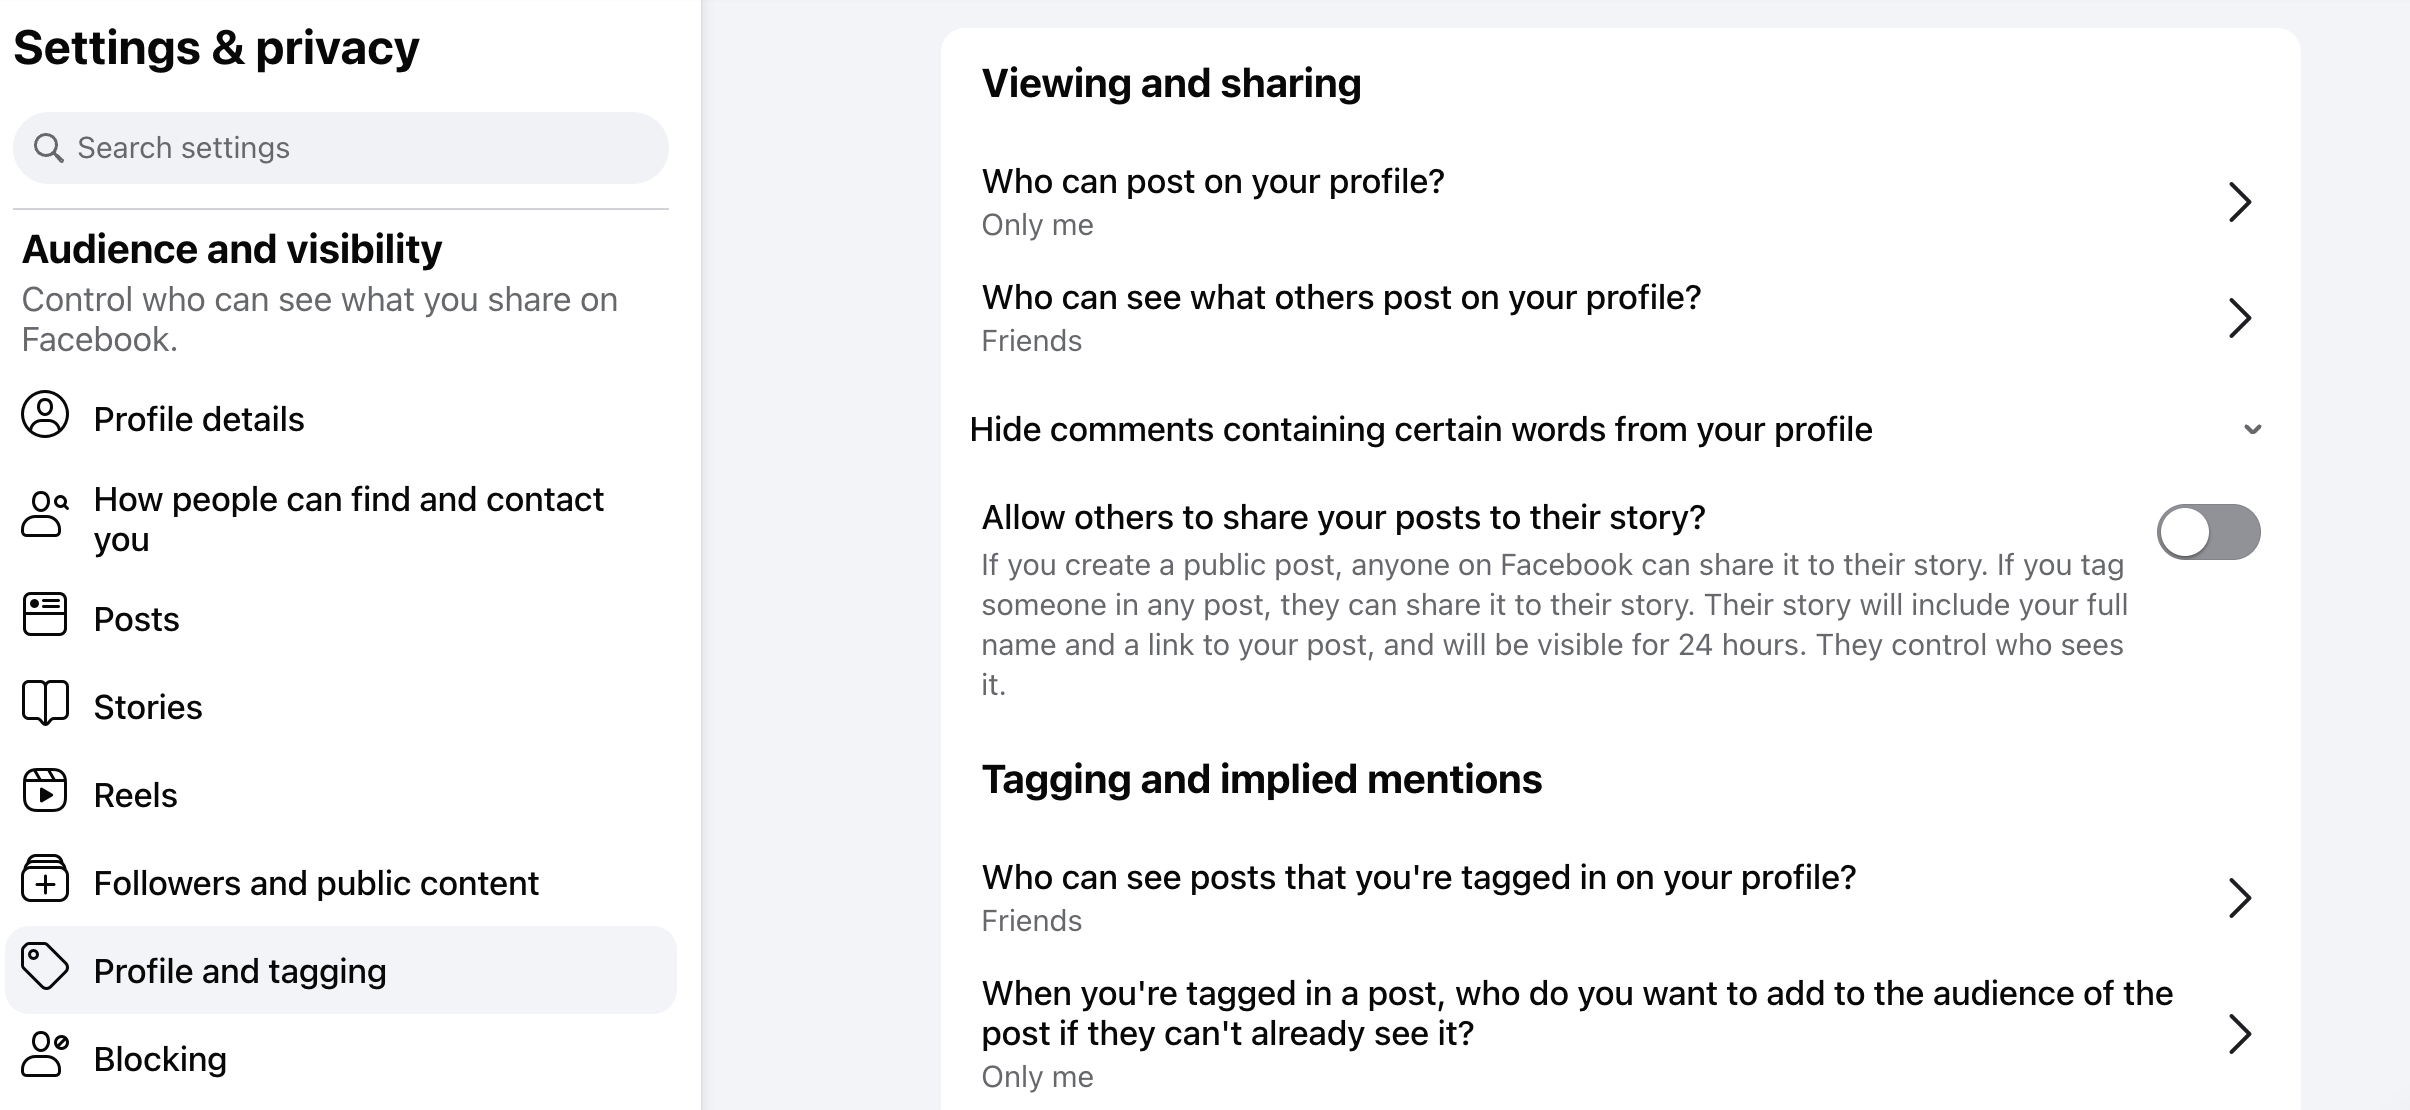
- From the “Settings” menu, select “Profile and Tagging.”
- You can update the settings by clicking “Edit” next to the applicable section. These sections are:
Protect your friends list and friends requests
We’ve all heard about Facebook scams where unscrupulous individuals impersonate friends of their targets to request money or personal information. It’s easy for scammers to do this when your Facebook friends list is public. And it’s equally easy to fall for this scam. After all, who hasn’t forgotten a password and gotten locked out of an account at some point?
To enhance your privacy on Facebook and protect yourself from scams, we recommend blocking strangers from seeing your friends list and sending you friend requests. Here’s how to do this:
- From the “Settings and privacy” menu, choose “Settings.”
- Under “How People Find and Contact You,” click on “Who can send you friend requests.”
- Click the dropdown and change it from “Everyone” to “Friends of Friends.”

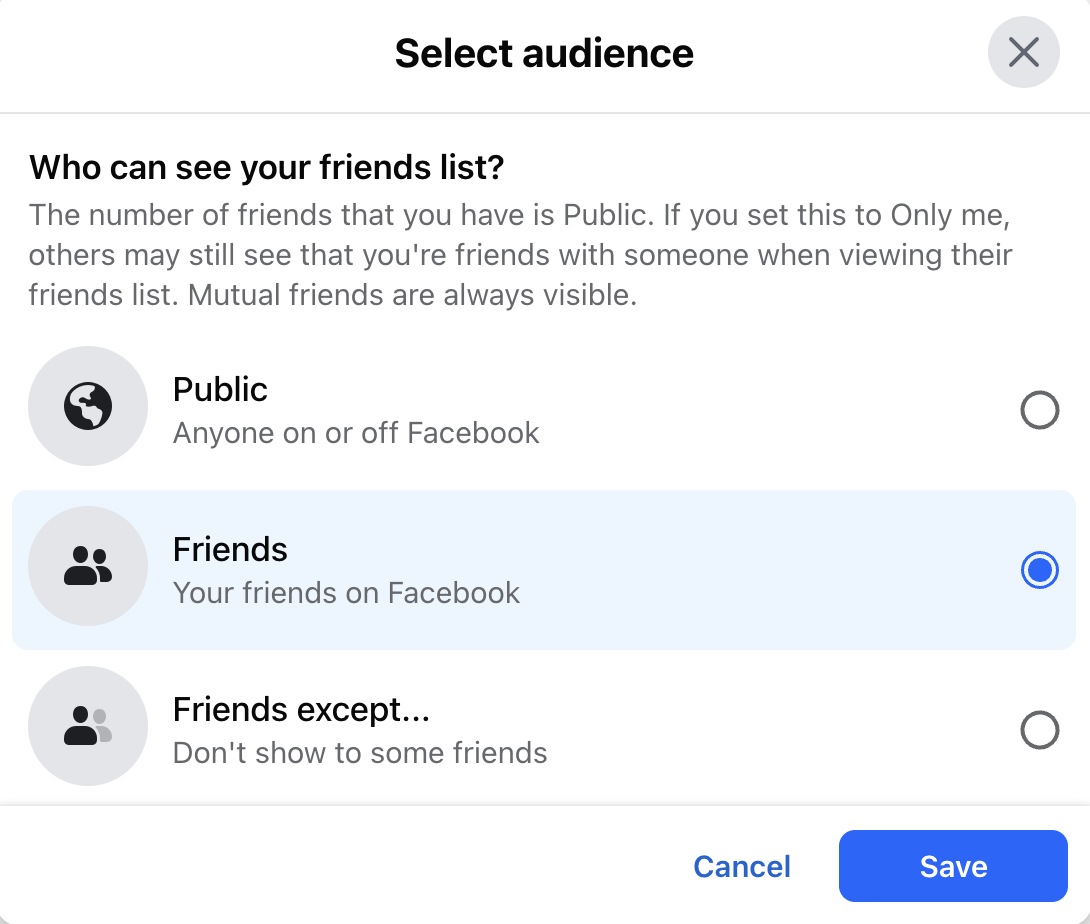
- Click “Edit” next to “Who can see your friends list?”
- Change this to “Only Me,” “Friends,” or “Specific Friends.”
Limit who can message you on Facebook
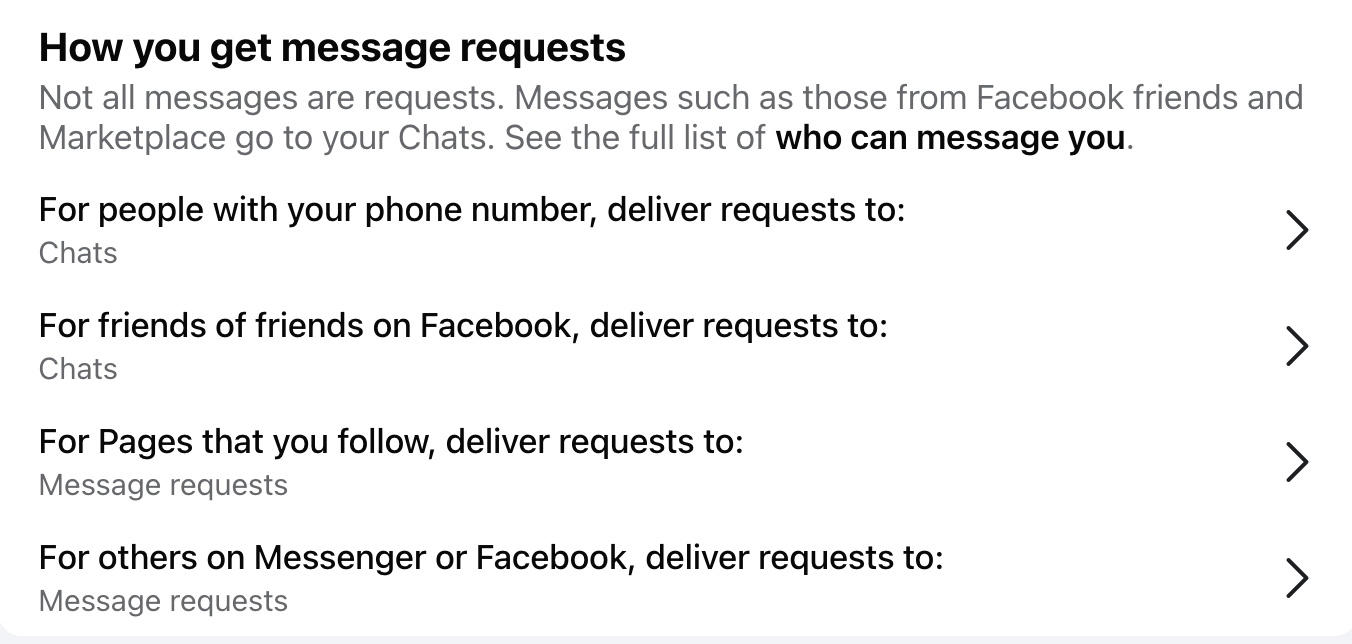
You can also limit who can send you a message on Facebook. This will ensure scammers and spam messages do not make it into your inbox. Follow the steps below to change how you get message requests:
- From the Privacy settings, navigate to the “How You Get Message Requests” section.
- Click on the areas that you want to change. For example, click “For others on Messenger or Facebook, deliver requests to:” to edit them.
Note:
While Meta heavily monitors your public posts and platform activity to build ad profiles, they have now rolled out default end-to-end encryption (E2EE) for all personal Messenger chats. This means your private, one-on-one conversations are securely encrypted and cannot be read by Meta, advertisers, or hackers.
The best VPNs for Facebook
We recommend using a VPN when browsing Facebook to protect your privacy. A VPN encrypts your internet traffic and routes it through secure servers before connecting to Facebook.
This prevents Facebook from tracking your location. It also blocks third parties, like your internet service provider or hackers, from seeing what you’re doing on Facebook.
We tested 15+ VPNs to determine the best VPN for Facebook. The VPNs below are our top three picks. In choosing these VPNs, we considered their security, speed, cost, privacy, and other factors.
1. NordVPN: The overall best VPN for Facebook
What we like
- 9300+ servers worldwide to hide your identity
- Built-in Threat Protection Pro
- Blazing fast speeds
- Strict no-logs policy
- Compatible with Windows, macOS, Linux, Android, iPhone, routers, and more
What we don't like
- Only 10 simultaneous connections
NordVPN is our top choice for Facebook. For starters, it uses military-grade encryption to protect your data from the snooping eyes of hackers on public Wi-Fi, stop your internet service provider from seeing your online activity, and prevent Facebook from tracking your physical location.
NordVPN has over 9300 encrypted servers spread out globally. Each server you connect to gives you a unique IP address for that country or location. This not only helps to hide your personal information, but it also helps you bypass censorship in countries where Facebook (or any other website) is blocked, like China or Iran. We’ve tested NordVPN’s ability to unblock Facebook, and it works like a charm.
We also love the fact that NordVPN does not log users’ activities. This VPN is frequently audited by an independent party and has been found not to record, store, or share user data.
You can take advantage of NordVPN’s 30-day free trial to test the service at no cost. Read our comprehensive NordVPN review for more details about how this VPN performed in our tests.
2. Surfshark: Best budget VPN for Facebook

What we like
- 4500+ servers in nearly 100 countries
- Budget-friendly
- Unlimited device connections with one subscription
- Works on Windows, MacOS, Linux, Android, iOS, routers, and more
What we don't like
- Speeds vary on different servers
If you’re looking for a budget VPN for Facebook, look no further. Surfshark is a top-rated VPN that charges only $ 2.49 monthly for a long-term plan. Besides Facebook, Surfshark also masks your IP address to prevent Google, Microsoft, Apple, and Meta from tying your physical location to your online profile.
If you use Facebook frequently, you need a VPN that can run on your computer, iPhone, or iPad. Surfshark supports unlimited devices with one subscription. You can use it on all your devices and even share your account with friends.
Surfshark is easy-to-use. If you don’t have experience with VPNs, all you have to do is open the app and tap on Quick Connect, and you’re good to go. It’s that easy. Get started below.
You can learn more about Surfshark’s pricing and features in our comprehensive Surfshark review.
3. Proton VPN: The most secure free VPN for Facebook
What we like
- Offers a 100% free plan with no data limits or ads
- Open-source apps
- Independently audited no-logs policy
- Based in privacy-friendly Switzerland
- Paid plan unblocks all major streaming platforms
What we don't like
- The free version restricts you to random servers in only 10 countries
- The free servers can be slow due to overcrowding
Proton VPN is a highly trusted, open-source VPN built by the scientists behind Proton Mail. It secures your data using strong encryption so hackers on public Wi-Fi can’t intercept it.
Proton VPN also prevents Facebook from tracking your location. When you connect to one of its 20400+ servers in over 148 countries, Proton VPN replaces your real IP address and limits Meta’s ability to map out where you live and travel. If you upgrade to their paid Plus plan, you also get access to NetShield, an advanced feature that actively blocks ads, trackers, and malicious sites from loading in the background.
What truly sets Proton VPN apart is its free tier. It is the only secure VPN on the market that offers unlimited data with zero ads. While free users are restricted to connecting to random servers across 10 countries, upgrading to a paid plan unlocks the fastest speeds, thousands of servers, and manual location selection.
A solid cybersecurity and privacy package with a whopping 70% off
At $ 2.99/month for the premium version, Proton VPN is a powerhouse for privacy. You can find out more about its free and paid features in our comprehensive Proton VPN review.
How does Facebook use your data?
Facebook amasses a trove of user data – from logging personal data to tracking user activity on and off the platform. But what does the company use all this data for? Everything boils down to growing Facebook’s revenues.
In general, Facebook uses your personal data to:
- Deliver targeted ads and support behavioral marketing
- Improve third-party advertising
- Personalize your feed and keep you scrolling and on the platform longer
- Perform product research and testing
- Comply with law enforcement or legal requests
Facebook privacy policy
We dug through Facebook’s privacy policy for more insight into Facebook’s data handling practices.
Facebook’s privacy policy isn’t the most transparent. For example, you cannot review previous versions of the policy, only the most current version. But that isn’t the only red flag. Below are just a few things we noticed:
- The service’s general security practices are not outlined.
- Users are not necessarily notified in the event of a data breach.
- Third parties are granted access to users’ personal data.
- Law enforcement agencies are usually granted access to Facebook’s user data.
What data does Facebook collect?
We know that Facebook collects basic identity and contact information from its users. Unless you change your Facebook privacy settings, Facebook also collects a host of other data.

Let’s take a closer look at the data Facebook collects:
- The data you provide like your name, age, location, hometown, religious views, and political views
- Your activity on and off Facebook, like your posts, the websites and physical places you visit, what you search for online, and what you purchase
- Your friends and contacts, particularly how you interact with your friends or contacts
- How you use its affiliated companies, like WhatsApp, Instagram, etc.
- Your transactions, including purchases of Facebook-affiliated or Facebook-owned products and services
- How you use Facebook, including the date and time you logged in, the browsers you use, and your location
- Your device data, such as your operating system, versions of your hardware and software, how much storage space your device has, apps installed, file names and types, mouse movements, and device signals (e.g. Bluetooth, Wi-Fi access points, GPS location)
- Non-user information, if that person is listed in a contact list with an email, phone number, or another account connected to Facebook
- Information from third-party partners, such as interactions, purchases, and other data you provide a third-party
Why make your information on Facebook private?
One of the biggest concerns for most social media users is how their personal information is used.
Facebook is notorious for using the personal data of users to generate profits – this includes data from platforms they have a controlling interest in, such as WhatsApp and Instagram. This is a major privacy concern with Facebook – but it’s far from the only one.
Below are a few reasons why it’s important to optimize your Facebook privacy settings:
- To keep your personal information private: Information about where you live or go to school and when you were born can be used to create a profile of you. Fortunately, you can protect this information with just a few key changes to your Facebook privacy settings.
- To keep you and your family safe from threat actors: Limiting access to your Facebook profile and friends list limits the chances of scammers finding you and your family on Facebook.
- To stop scammers from contacting you: If you’ve been on Facebook, you’ve probably received a random friend request or message request. While not all of these are scammers, the majority are trying to scam you or at least trying to sell you something you don’t want. Changing your privacy settings on Facebook ensures you don’t fall in the crosshairs of scammers.
- To protect your professional reputation: Whether you posted New Year’s Eve party pictures or someone tagged you in a controversial post, current and potential employers or clients might be able to see them. However, if you take control of your privacy settings on Facebook, you can choose who has access to that information.
Take Control of Your Data
Facebook collects a staggering amount of data, but you don’t have to accept it. By adjusting your privacy settings and using tools like the Accounts Center, turning off mobile Link History, and stopping Meta from scraping your posts to train its AI can better protect your information.
While adjusting these settings stops Facebook’s behavioral tracking, they don’t fully protect your broader online activity. So, for additional privacy, pair these settings with a premium VPN, such as NordVPN. A reliable Facebook VPN masks your IP address, stopping Meta from tracking your real-world location while securing your connection against hackers, especially on public Wi-Fi.
Facebook isn’t the only social media platform guilty of invasive privacy practices. The articles below contain instructions on how to secure your privacy on:
- X (Twitter)
- Best VPN for Twitter (X)
- How to bypass Twitter age verification
- Snapchat
- Skype
FAQ
Do you have specific questions about optimizing your Facebook privacy settings? Check out the FAQ section below. Click on a question to see the answer.
There are several Facebook privacy settings you should tweak to secure your privacy. Here are a few:
- Set your posts to friends only.
- Only allow friends to tag you in posts and get your approval before their posts appear on your timeline.
- Limit who can contact you on Facebook.
- Set your friends lists to be only visible to you and your current friends.
- Limit who can see the posts you’re tagged in.
- Block Facebook activity tracking.
- Block third-party apps and websites from accessing your data.
- Hide your profile from search engines.
Your profile will never be 100% private, but you can reduce the data available to Facebook and other snooping eyes with a few changes to your Facebook settings. These include:
- Changing your profile and cover pictures to generic photos.
- Change your name and username to something harder to link back to you specifically, i.e., your first name and the initial of your last name, for example.
- Change all of your posts to friends only or only me.
- Hide your personal information from your profile, i.e., your birthday, location, employer, etc.
- Hide your profile from search engines.
- Only allow friends of friends to message you or send you a friend request.
- Hide your friends list.
- Set the pages you like and follow to be visible to only you.
There are two ways to do this. First, you can go to your Privacy settings under the “Settings and Privacy” menu on Facebook and set your post visibility default to “Friends” or “Specific Friends.”
You can also choose the audience for specific posts by clicking on the three dots in the top right of Facebook and selecting “Edit Audience.” Then either “Friends,” “Specific Friends,” or “Me Only.”
You’ll find most relevant privacy settings on Facebook under “Settings & privacy.” To access this, click your profile picture in the top right-hand corner and select “Settings & privacy.”